
Appearance
Sending an Announcement
Announcements are messages from the workspace owner to staff and clients. They appear on the dashboard, can be shared via a public link, and can collect comments from recipients. Use them for holiday schedules, term updates, program announcements, or any communication that needs to reach your audience.
This tutorial walks through creating and publishing an announcement. Takes about 3 minutes.
1. Open the Announcements page
Click Announcements in the sidebar (under CRM).
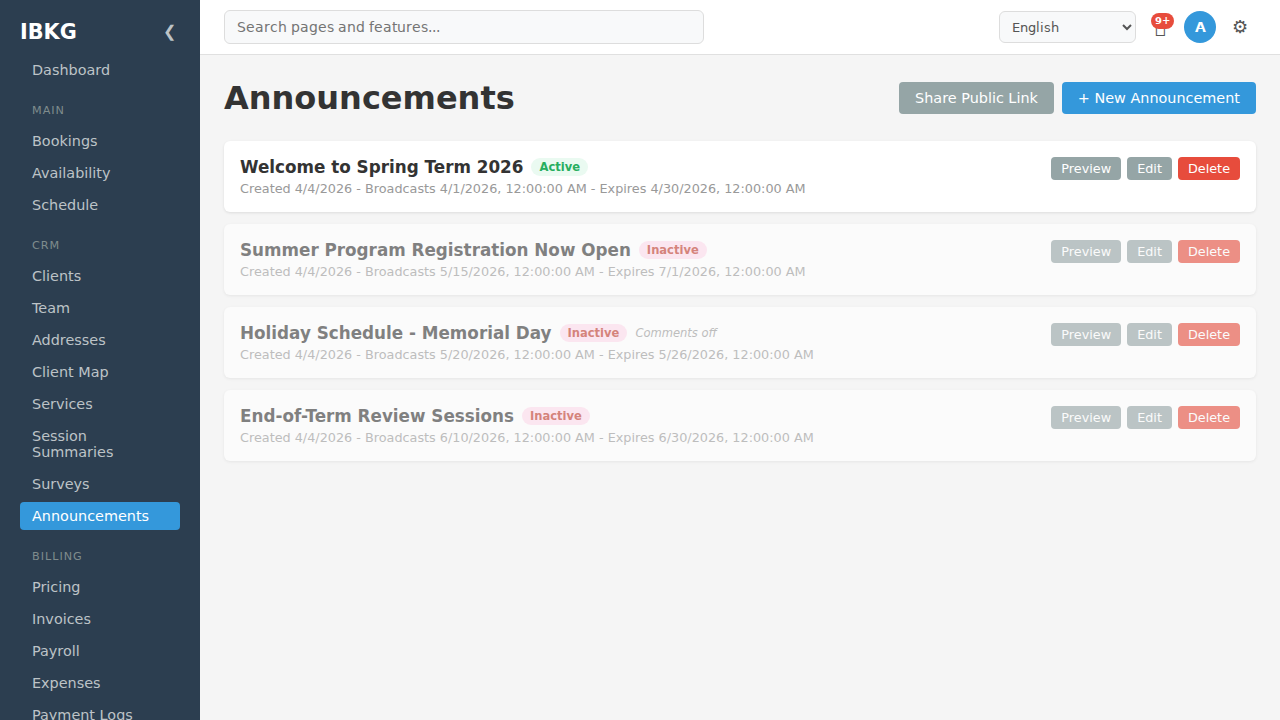
The Announcements page shows every announcement with:
- Title and status badge (
ActiveorInactivebased on broadcast/expiry dates) - Comments off tag if comments are disabled
- Created date - when you drafted it
- Broadcasts - when it starts showing to recipients
- Expires - when it stops showing
- Actions - Preview / Edit / Delete
Top-right buttons:
- Share Public Link - generate one URL that shows all active announcements (great for a website widget)
- + New Announcement - create a new one
2. Write the announcement
Click + New Announcement. The editor opens:
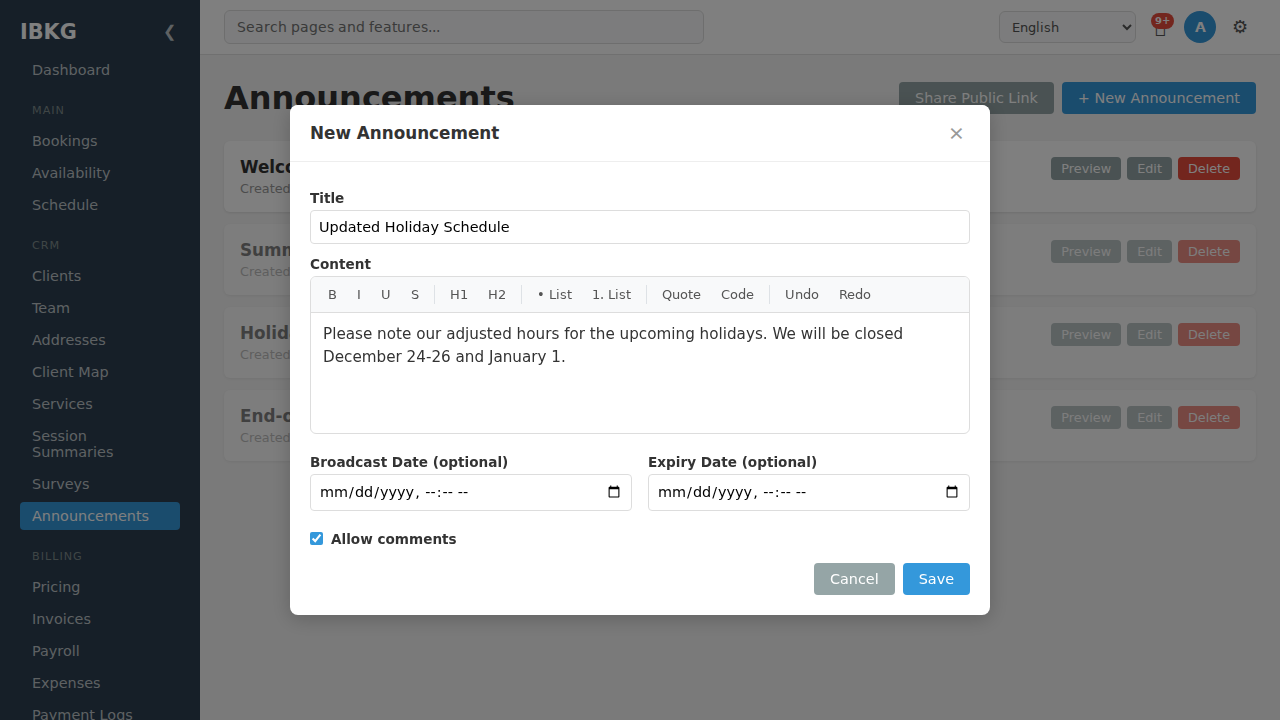
Fields:
- Title (required) - short heading for the announcement
- Content - rich text body with formatting toolbar (bold, italic, underline, strikethrough, H1/H2, bullet and numbered lists, quote, code, undo/redo)
- Broadcast Date (optional) - when the announcement goes live. Leave blank to publish immediately.
- Expiry Date (optional) - when the announcement stops showing. Leave blank to show indefinitely.
- Allow comments checkbox - if on, public viewers can comment via Google login
Write a clear title and body. Example:
Title: Updated Holiday Schedule
Content: Please note our adjusted hours for the upcoming holidays.
We will be closed December 24-26 and January 1.
3. Schedule publication
The broadcast/expiry dates let you pre-write announcements and have them appear automatically:
- Broadcast next Monday - write it today, set Broadcast Date to Monday. Shows up Monday at the configured time.
- Auto-expire after a week - set Expiry Date to a week from broadcast. Disappears automatically.
- Persistent announcement - leave both blank. Active immediately and forever.
FoxCLM uses the announcement's status badge (Active / Inactive) to indicate whether it's currently visible based on these dates.
4. Allow comments
Tick Allow comments if you want recipients to reply. For example:
- Term orientation announcement with questions staff can ask
- Program feedback announcement where clients respond with their thoughts
- Feature request discussion
Comments appear below the announcement on the public page. Commenters must log in with Google (for authenticity and spam prevention).
Leave off for broadcast-only messages where you don't want noise.
5. Save
Click Save. The announcement appears in the list with its computed status.
6. Preview
Click Preview on any announcement row to see how it renders. Good for checking formatting and layout before hitting broadcast date.
7. Share publicly
Two sharing paths:
One-off link for this announcement
From the Preview modal, copy the share URL. Anyone with the URL sees this specific announcement.
Persistent link for all active announcements
Click Share Public Link in the top-right. FoxCLM gives you a stable URL that always shows the current active announcements.
Use this on:
- Your website homepage
- An email signature
- A printed flyer / QR code
- Social media bio
The public page auto-updates as you publish new announcements and old ones expire.
8. Announcements on the staff/client dashboard
Active announcements appear on the Dashboard inside FoxCLM for logged-in staff and collaborators. They're also pinned to the Staff Portal home page.
Staff see them immediately on login - no need to check a separate inbox.
9. Emailing announcements
Announcements don't auto-email. But the send_announcement workflow action can email one to all staff when triggered.
Setup:
- Create a custom status or transition (e.g. on a specific session type, or on a client transition).
- Add the
send_announcementaction. - In the action config, pick which announcement to send (or leave blank to email the announcement content on-demand).
See Workflow Actions.
Or for manual email: copy the announcement text, paste into a send_custom_email action with all staff as recipients.
10. Edit or delete
Edit reopens the modal with current values. Edits take effect immediately on the public page.
Delete removes the announcement permanently. No soft-delete recovery - be sure.
Tips
- Keep titles scannable. "Updated Holiday Schedule" beats "Important Notice Regarding Our Upcoming Holiday Operating Hours Changes".
- Set an expiry date. Dated announcements (holiday schedule, term start) should expire automatically - otherwise your public page fills with stale content.
- Use H1/H2 sparingly. Since the announcement itself has a title, body headings are for subsections only.
- Link externally. The rich-text editor supports URLs - embed links to your website, signup pages, resources.
- Comments = engagement. Only enable if you're going to respond. Unanswered questions look worse than no comments.
What's next
- Team Overview - who sees announcements (staff, collaborators, public)
- Workflow Actions - send announcements via the
send_announcementaction