
Appearance
Tracking Business Expenses
FoxCLM tracks your business expenses alongside bookings and invoices so you get one financial picture. Log expenses by scanning a receipt photo (OCR auto-fills vendor, date, amount) or entering them manually. Categorise by purpose, optionally attach receipt images, and route through an approval workflow.
Takes about 4 minutes.
1. Open the Expenses page
Click Expenses in the sidebar (under BILLING).
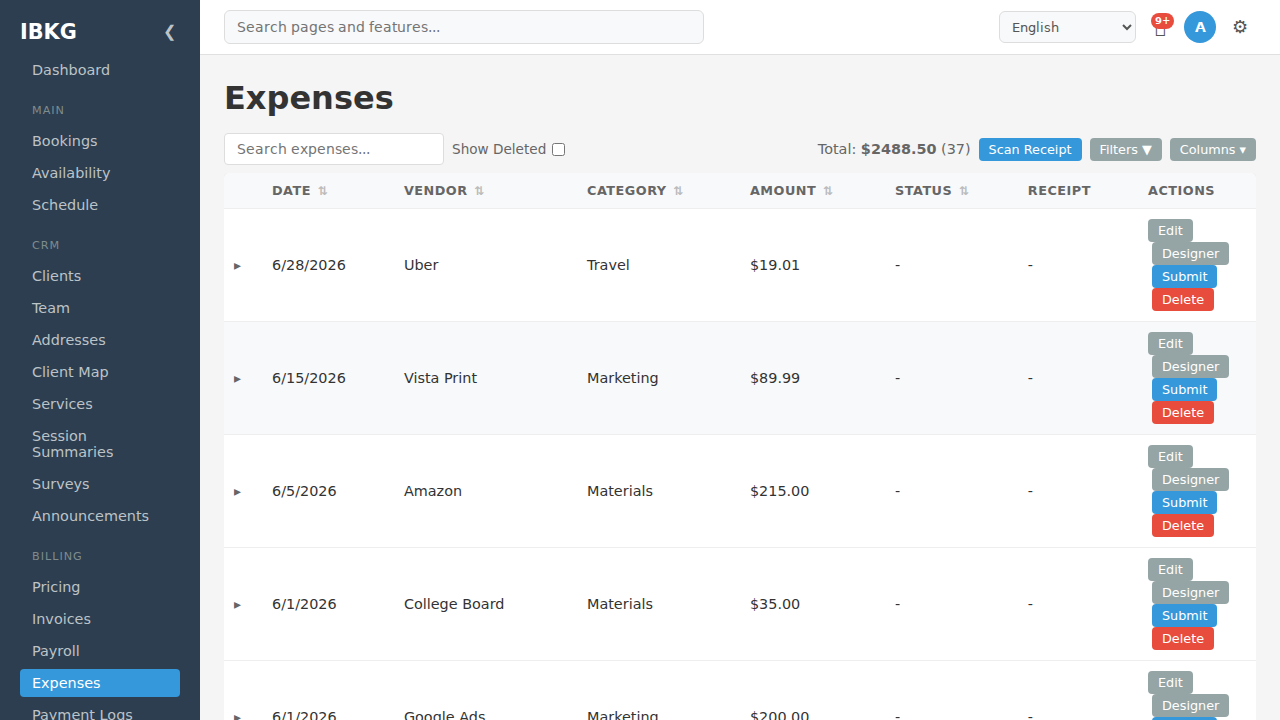
Page overview:
- Title bar - "Expenses" heading
- Search bar - filter by vendor, category, description
- Show Deleted - toggle to reveal soft-deleted entries
- Total - running sum of visible expenses with count (e.g. "Total: $2488.50 (37)")
- Scan Receipt button - upload a receipt image to auto-create an expense
- Filters / Columns - narrow by category/date; toggle visible columns
The table shows:
- Date - when the expense was incurred
- Vendor - who you paid (e.g. Uber, Amazon, Vista Print)
- Category - Travel, Materials, Marketing, etc. (configurable)
- Amount - cost with currency
- Status - workflow state (Draft, Submitted, Approved, Rejected)
- Receipt - thumbnail of the uploaded image
- Actions - Edit, Designer, Submit (for approval), Delete
2. Scan a receipt
The fastest way to log an expense is to photograph the receipt. Click Scan Receipt at the top. A file picker opens - select a photo from your computer.
FoxCLM runs OCR on the image and auto-extracts:
- Vendor - business name
- Date - receipt date
- Amount - total
- Currency - USD, MYR, etc.
The extracted data appears pre-filled in a new expense row. Review, correct any OCR errors, and save.
Attach the receipt image itself - FoxCLM stores it so you have proof for accounting or tax purposes.
3. Enter an expense manually
Click Edit on an existing row to see the edit modal:
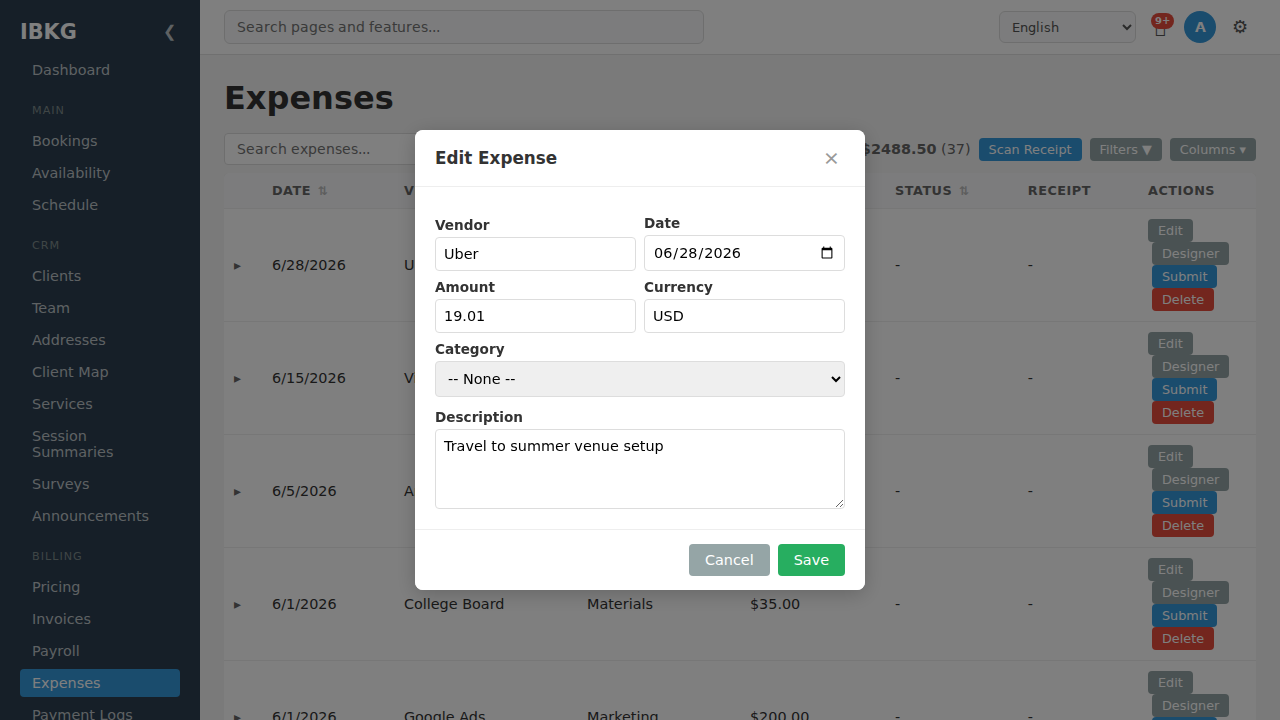
Fields:
- Vendor (required) - who you paid
- Date (required) - expense date
- Amount - cost as a number
- Currency - 3-letter code (USD, EUR, GBP, MYR, etc.)
- Category - pick from the built-in list (Food / Transport / Office / Supplies / Entertainment / Utilities / Other), or leave as None.
- Description - free-form notes (e.g. "Travel to summer venue setup")
Click Save.
4. Attach a receipt image
From the edit modal, scroll down to find the image upload control. Click to select a photo. FoxCLM stores it alongside the expense; the Receipt column on the list shows a thumbnail.
Click any receipt thumbnail on the list to view the full image in a lightbox.
5. Categorise spending
Categories let you group expenses for reporting. The built-in set:
- Food - meals, coffee, client lunches
- Transport - fuel, parking, rideshare, flights
- Office - rent, workspace costs
- Supplies - textbooks, art supplies, stationery, equipment
- Entertainment - client events, team outings
- Utilities - electricity, internet, phone
- Other - anything else
Consistent categorisation makes year-end reporting and tax filing much easier. Note that older expenses (created via earlier versions, or imported) may show categories outside this list - they display as-is but new expenses are restricted to the options above.
6. Submit for approval
If your business has multiple spenders (e.g. staff submitting reimbursement claims), use the approval workflow:
- The submitter creates an expense and clicks Submit on the row
- Status moves from
DrafttoSubmitted - An admin sees it in the list with Approve / Reject buttons
- On approval, status moves to
Approved; on rejection, with a prompted reason, toRejected
For solo operators, skip the submit step - expenses stay as Draft and you just use them for reporting.
7. Generate an expense report
Click Designer on any expense to open the document designer with the expense as its data source. Lay out a reimbursement statement with:
- Submitter name
- Expense list (date, vendor, amount)
- Total
- Receipt thumbnails
- Signature block
Save as a template to reuse for every expense report.
8. Filtering and sorting
The list defaults to date-descending (newest first). Click any column header to sort. Use the search bar for text search across vendor, category, and description.
Click Filters to narrow by:
- Date range
- Category
- Status
- Vendor substring
- Amount range
Filters stack - applied together they narrow the list.
9. Deleting and restoring
Click Delete to soft-delete an expense. It's hidden but recoverable via Show Deleted -> Restore. Permanent deletion is only via the Recycle Bin (Settings -> Recycle Bin).
Soft-delete preserves historical totals - deleted expenses don't appear in active reports but remain in the audit log.
10. Monthly / yearly totals
The toolbar shows the running total of currently-visible expenses. Combine with filters to see:
- This month - filter by date range
- All marketing - filter by category
- Above $500 - filter by amount range
For full reporting beyond simple totals, export the list to CSV via the browser's print/export (not built-in; use developer tools or the REST API).
Tips
- Photograph receipts immediately. Paper receipts fade and get lost. Scan the moment you get one.
- Use descriptive vendor names. "Uber" is better than "Transport"; the category tracks the purpose, the vendor tracks who got paid.
- Fill in the description - you'll thank yourself in 6 months when you're looking at "Amazon $245" trying to remember why.
- Set up an approval workflow for businesses with 2+ people spending money. It prevents budget leaks.
- Match expenses to events/clients when relevant via the description (e.g. "Client lunch - Aiden Brown / 4/24 session"). There's no direct link in the DB but searchable notes work.
What's next
- Invoice Designer - the same designer works for expense reports
- Custom Fields - add custom fields to clients, sessions, and invoices