
Appearance
Building Your First Workflow
Workflows are what make FoxCLM automate itself. Every status change on a session, invoice, client, or payroll can trigger transitions, fire actions (emails, webhooks, notifications), and evaluate conditions. This tutorial walks through the workflow editor and shows how to add your first custom status.
Takes about 6 minutes.
1. Open the Workflow page
Click Workflow in the sidebar (under AI TOOLS, or at Settings -> Workflows & Statuses).
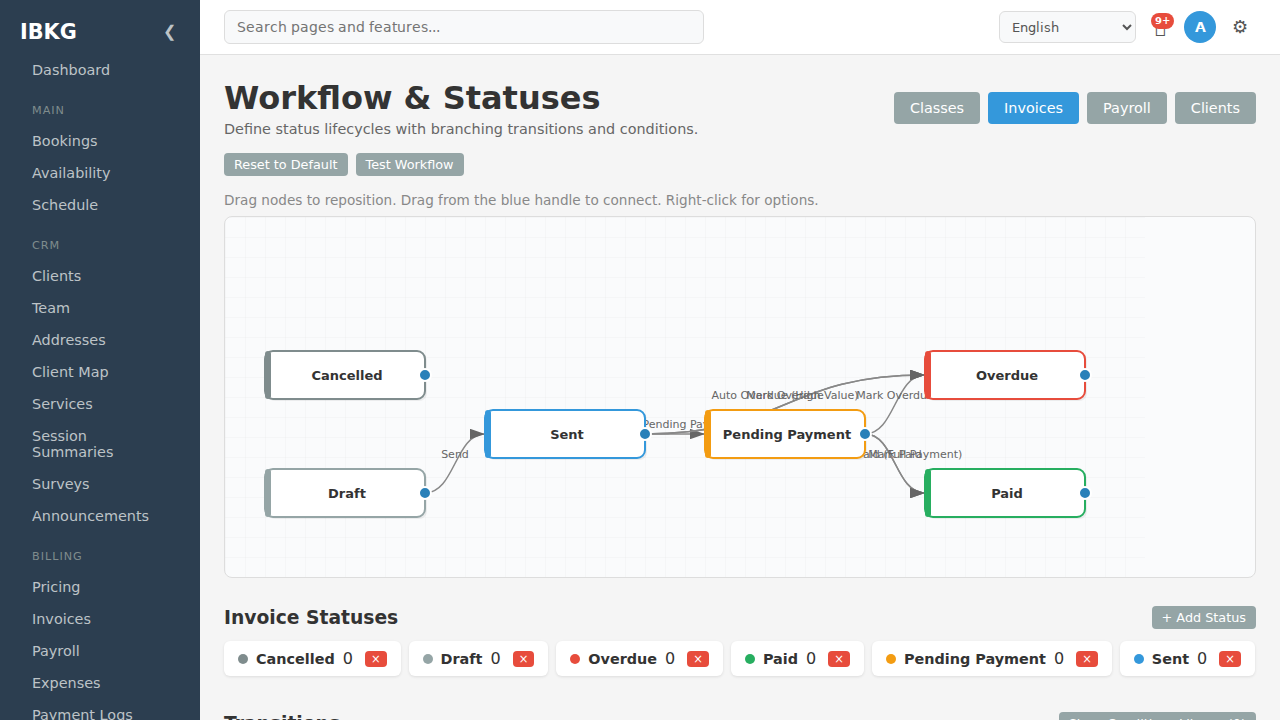
The page has four buttons at the top right that toggle which entity type you're editing:
- Classes - status lifecycle for sessions (e.g. Scheduled, Occurred, Cancelled)
- Invoices - billing lifecycle (Draft, Sent, Pending Payment, Paid, Overdue, Cancelled)
- Payroll - pay period lifecycle (Draft, Approved, Rejected, Paid)
- Clients - CRM lifecycle (Lead, Active, Inactive, Churned)
The visual flowchart shows:
- Status nodes - rounded rectangles, one per status, coloured by the status colour
- Transition arrows - connecting one status to another, with a label (e.g. "Send", "Mark Paid")
- Blue handles - drag from one node's handle to another to create a new transition
- Hint text - "Drag nodes to reposition. Drag from the blue handle to connect. Right-click for options."
Below the flowchart:
- Invoice Statuses (or whichever type you're viewing) - the list of statuses with counts of entities currently in each status
- + Add Status - button to add a new status
- Transitions - tabular list of every transition
2. The transitions table
Scroll down to see every transition in a table view:
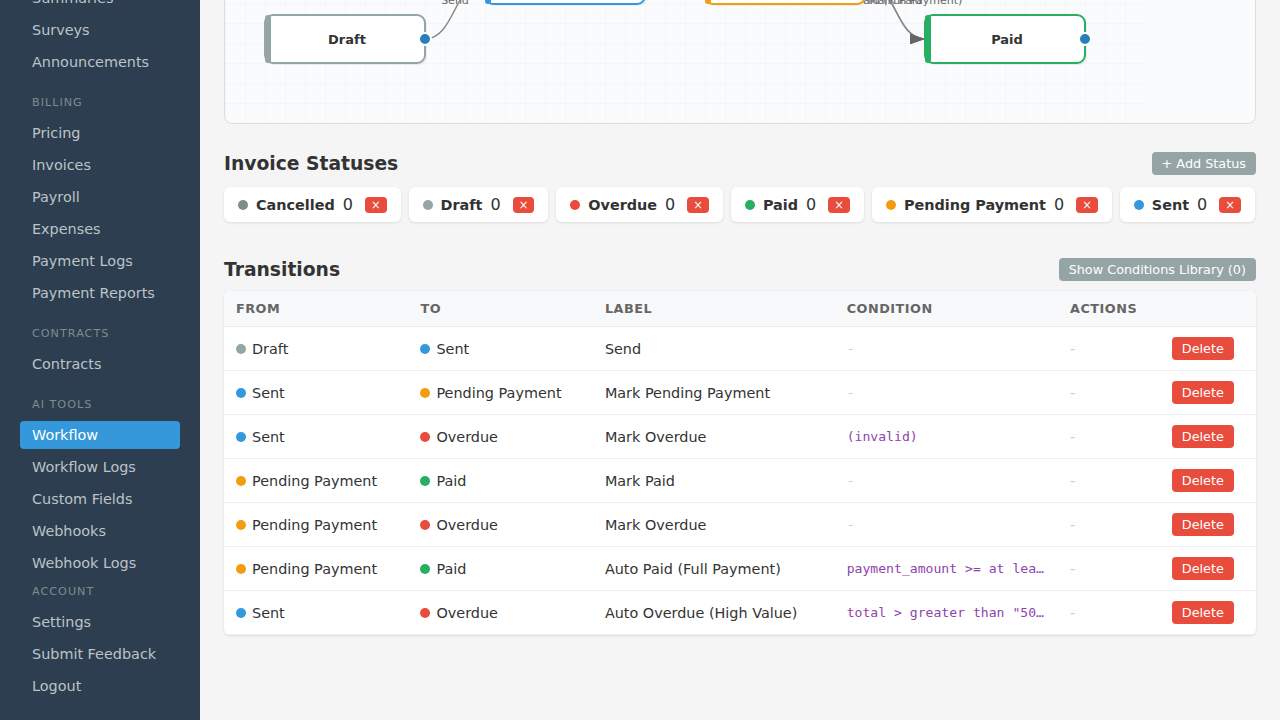
Each row is one transition with:
- From - starting status (coloured dot)
- To - ending status (coloured dot)
- Label - the button text clients and users see (e.g. "Send", "Mark Paid", "Auto Paid (Full Payment)")
- Condition - optional rule that must be true for the transition to fire
- Actions - number of actions attached (emails, webhooks, etc.)
- Delete - remove the transition
Look at the seeded Invoice workflow:
- Draft -> Sent (label: "Send") - manual click
- Sent -> Pending Payment (label: "Mark Pending Payment") - manual
- Pending Payment -> Paid (label: "Mark Paid") - manual
- Pending Payment -> Paid (label: "Auto Paid (Full Payment)", condition:
payment_amount >= ...) - auto-advance - Sent -> Overdue (label: "Auto Overdue (High Value)", condition:
total > greater than "50...") - auto-advance
Both manual and auto transitions live side by side. The sort order determines priority when multiple could fire at once.
3. Add a new status
Scroll back up and click + Add Status (either below the flowchart or in the Statuses section):
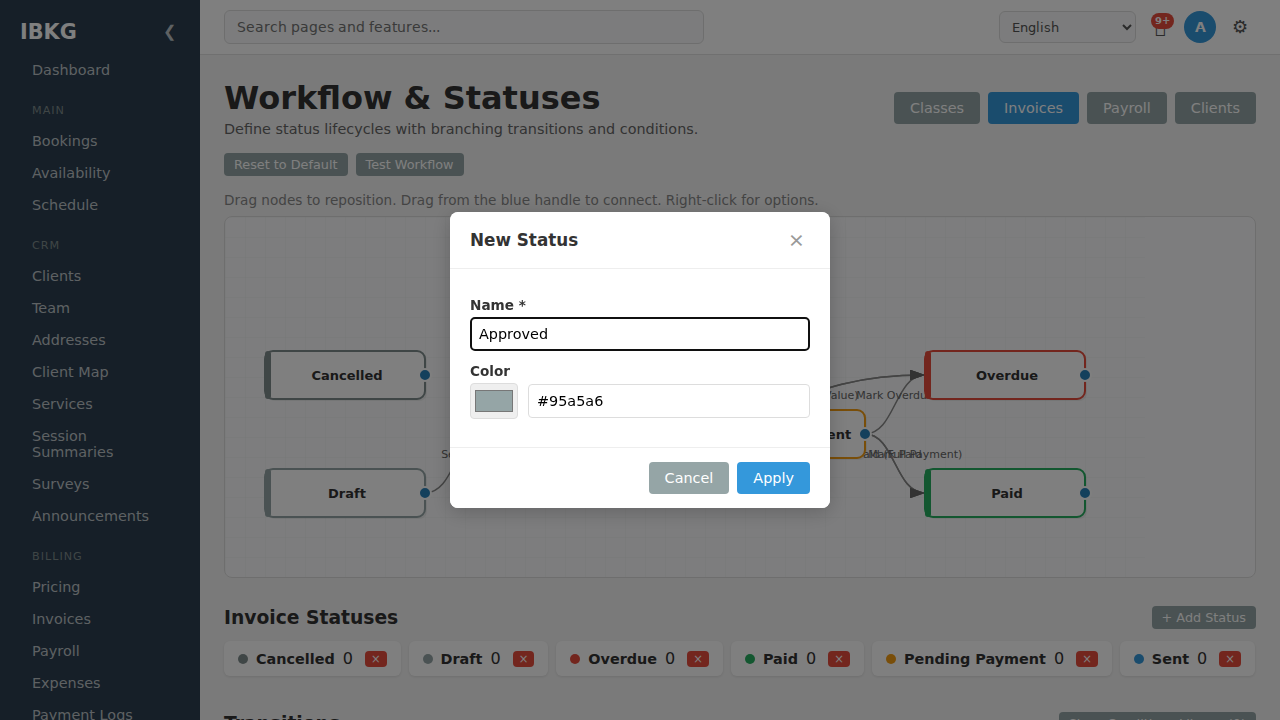
Fields:
- Name (required) - the label users see (e.g. "Approved", "Submitted for Review", "On Hold")
- Color - the colour for the status badge throughout the app; pick from the swatch or enter a hex code
Common examples:
| Name | Good colour | Use for |
|---|---|---|
| Submitted for Approval | Orange #f39c12 | Invoices waiting on an admin |
| Approved | Green #27ae60 | Approved but not yet sent |
| On Hold | Grey #95a5a6 | Paused pending more info |
| Disputed | Red #e74c3c | Client contested the charge |
Click Apply to add the status. It appears as a new node on the flowchart (positioned at the top-left of the canvas - drag it where you want it).
4. Add a transition
Hover over any status node. A blue handle appears on the right edge. Drag from the handle to another status - FoxCLM draws an arrow and opens the transition editor.
Fill in:
- Label - what users see on the button (e.g. "Submit for Approval")
- Condition (optional) - a rule like "only if amount > 500"
- Actions (optional) - what should fire when the transition runs
For a simple manual transition (Draft -> Submitted for Approval), no condition or actions are needed - just the label. Click Save.
5. Add a condition
Conditions are how auto-advance works. A transition with a condition fires automatically when the condition becomes true.
Click an existing transition's label (e.g. "Auto Paid (Full Payment)") to open the editor. In the Condition section, you can build a rule with:
Fields - any column on the entity (e.g. amount, due_date, status_text, created_at, or any custom field)
Operators:
| Op | Meaning |
|---|---|
eq | Equal |
neq | Not equal |
gt / gte | Greater than / or equal |
lt / lte | Less than / or equal |
is_null / is_not_null | Missing / present |
contains | Substring (case-insensitive) |
Values - either a literal (500, "paid") or another column (due_date)
Special values - $NOW (current datetime), $TODAY (current date at midnight)
Compound conditions - combine multiple rules with and / or
Example: Auto-send overdue email
When an invoice has been
Sentfor more than 7 days and has no payment, auto-move toOverdue.
Transition: Sent -> Overdue
Condition:
logic: and
rules:
  - field: due_date
    op: lt
    value: $NOW
  - field: paid_at
    op: is_null
Action: send_overdue_notice
The cron evaluates this every few minutes. The moment the due date passes on an unpaid invoice, the transition fires and the overdue email goes out.
6. Add an action
Actions are what happen when a transition fires. Open any transition's editor and click + Add Action.
FoxCLM has 25 action types. Pick one from the dropdown - common ones:
send_invoice_email- email the invoice to linked clientssend_paid_confirmation- payment receiptsend_overdue_notice- reminder emailsend_custom_email- any custom subject and body (great for brand-specific messaging)call_webhook- fire a saved webhook (Slack, Zapier, custom API)call_api- raw HTTP call with templated bodycreate_notification- in-app bell notificationshare_invoice/unshare_invoice- manage the public link
Each action has its own config. For example, send_reminder_email asks for hours_before; send_custom_email asks for subject and body HTML.
See Workflow Actions for the full list.
7. Test your workflow
Click Test Workflow at the top of the page. FoxCLM runs a dry-run on every transition:
- All transitions are enumerated
- Mock entities are generated that satisfy each condition
- Failed or invalid conditions are flagged
- End-to-end paths (Start -> End) are listed
Use this before relying on complex conditions to catch typos and bad logic.
8. Reset to default
If you've made a mess, click Reset to Default at the top. FoxCLM wipes your custom statuses and transitions for the current entity type and rebuilds the default set.
This is destructive - any entities currently in a custom status will lose that status. Only do this during setup, not on a live workflow.
Common workflows to build
Simple invoice flow
Draft -> Sent (manual, action: send_invoice_email)
Sent -> Paid (manual)
Sent -> Overdue (auto, condition: due_date < $NOW, action: send_overdue_notice)
Overdue -> Paid (manual, action: send_paid_confirmation)
Approval flow
Draft -> Submitted (manual)
Submitted -> Approved (manual, action: send_invoice_email)
Submitted -> Draft (manual, rejection)
Approved -> Paid (manual, action: send_paid_confirmation)
Client re-engagement
Active -> Inactive (auto, condition: last_session_at < 60 days ago)
Inactive -> Churned (auto, condition: last_session_at < 180 days ago, action: send_reengagement_email)
What's next
- Workflow Actions - full reference of all 25 action types
- Webhooks & API - fire external integrations
- Automation Settings - global auto-advance toggles