Appearance
Invoice Designer
The designer is a drag-drop tool for controlling exactly how a document looks. It is the same designer used for invoices, payroll statements, expense reports, payment reports, and contracts - each document type exposes its own set of data fields on a shared canvas.
Opening the designer
From the invoice editor, click Design to open the layout canvas.
The workspace
- Top bar - a Design / Preview / Download segmented control. Design is the editing canvas; Preview renders the document with real data; Download exports the rendered PDF.
- Left panel - the Fields panel, grouped by category. Drag a field onto the canvas to place it.
- Canvas - a fixed US Letter page (8.5 x 11 in). Only the orientation is adjustable - there is no paper-size or margin setting.
- Right panel - shows the block inspector when a block is selected, and Page Properties when nothing is selected.
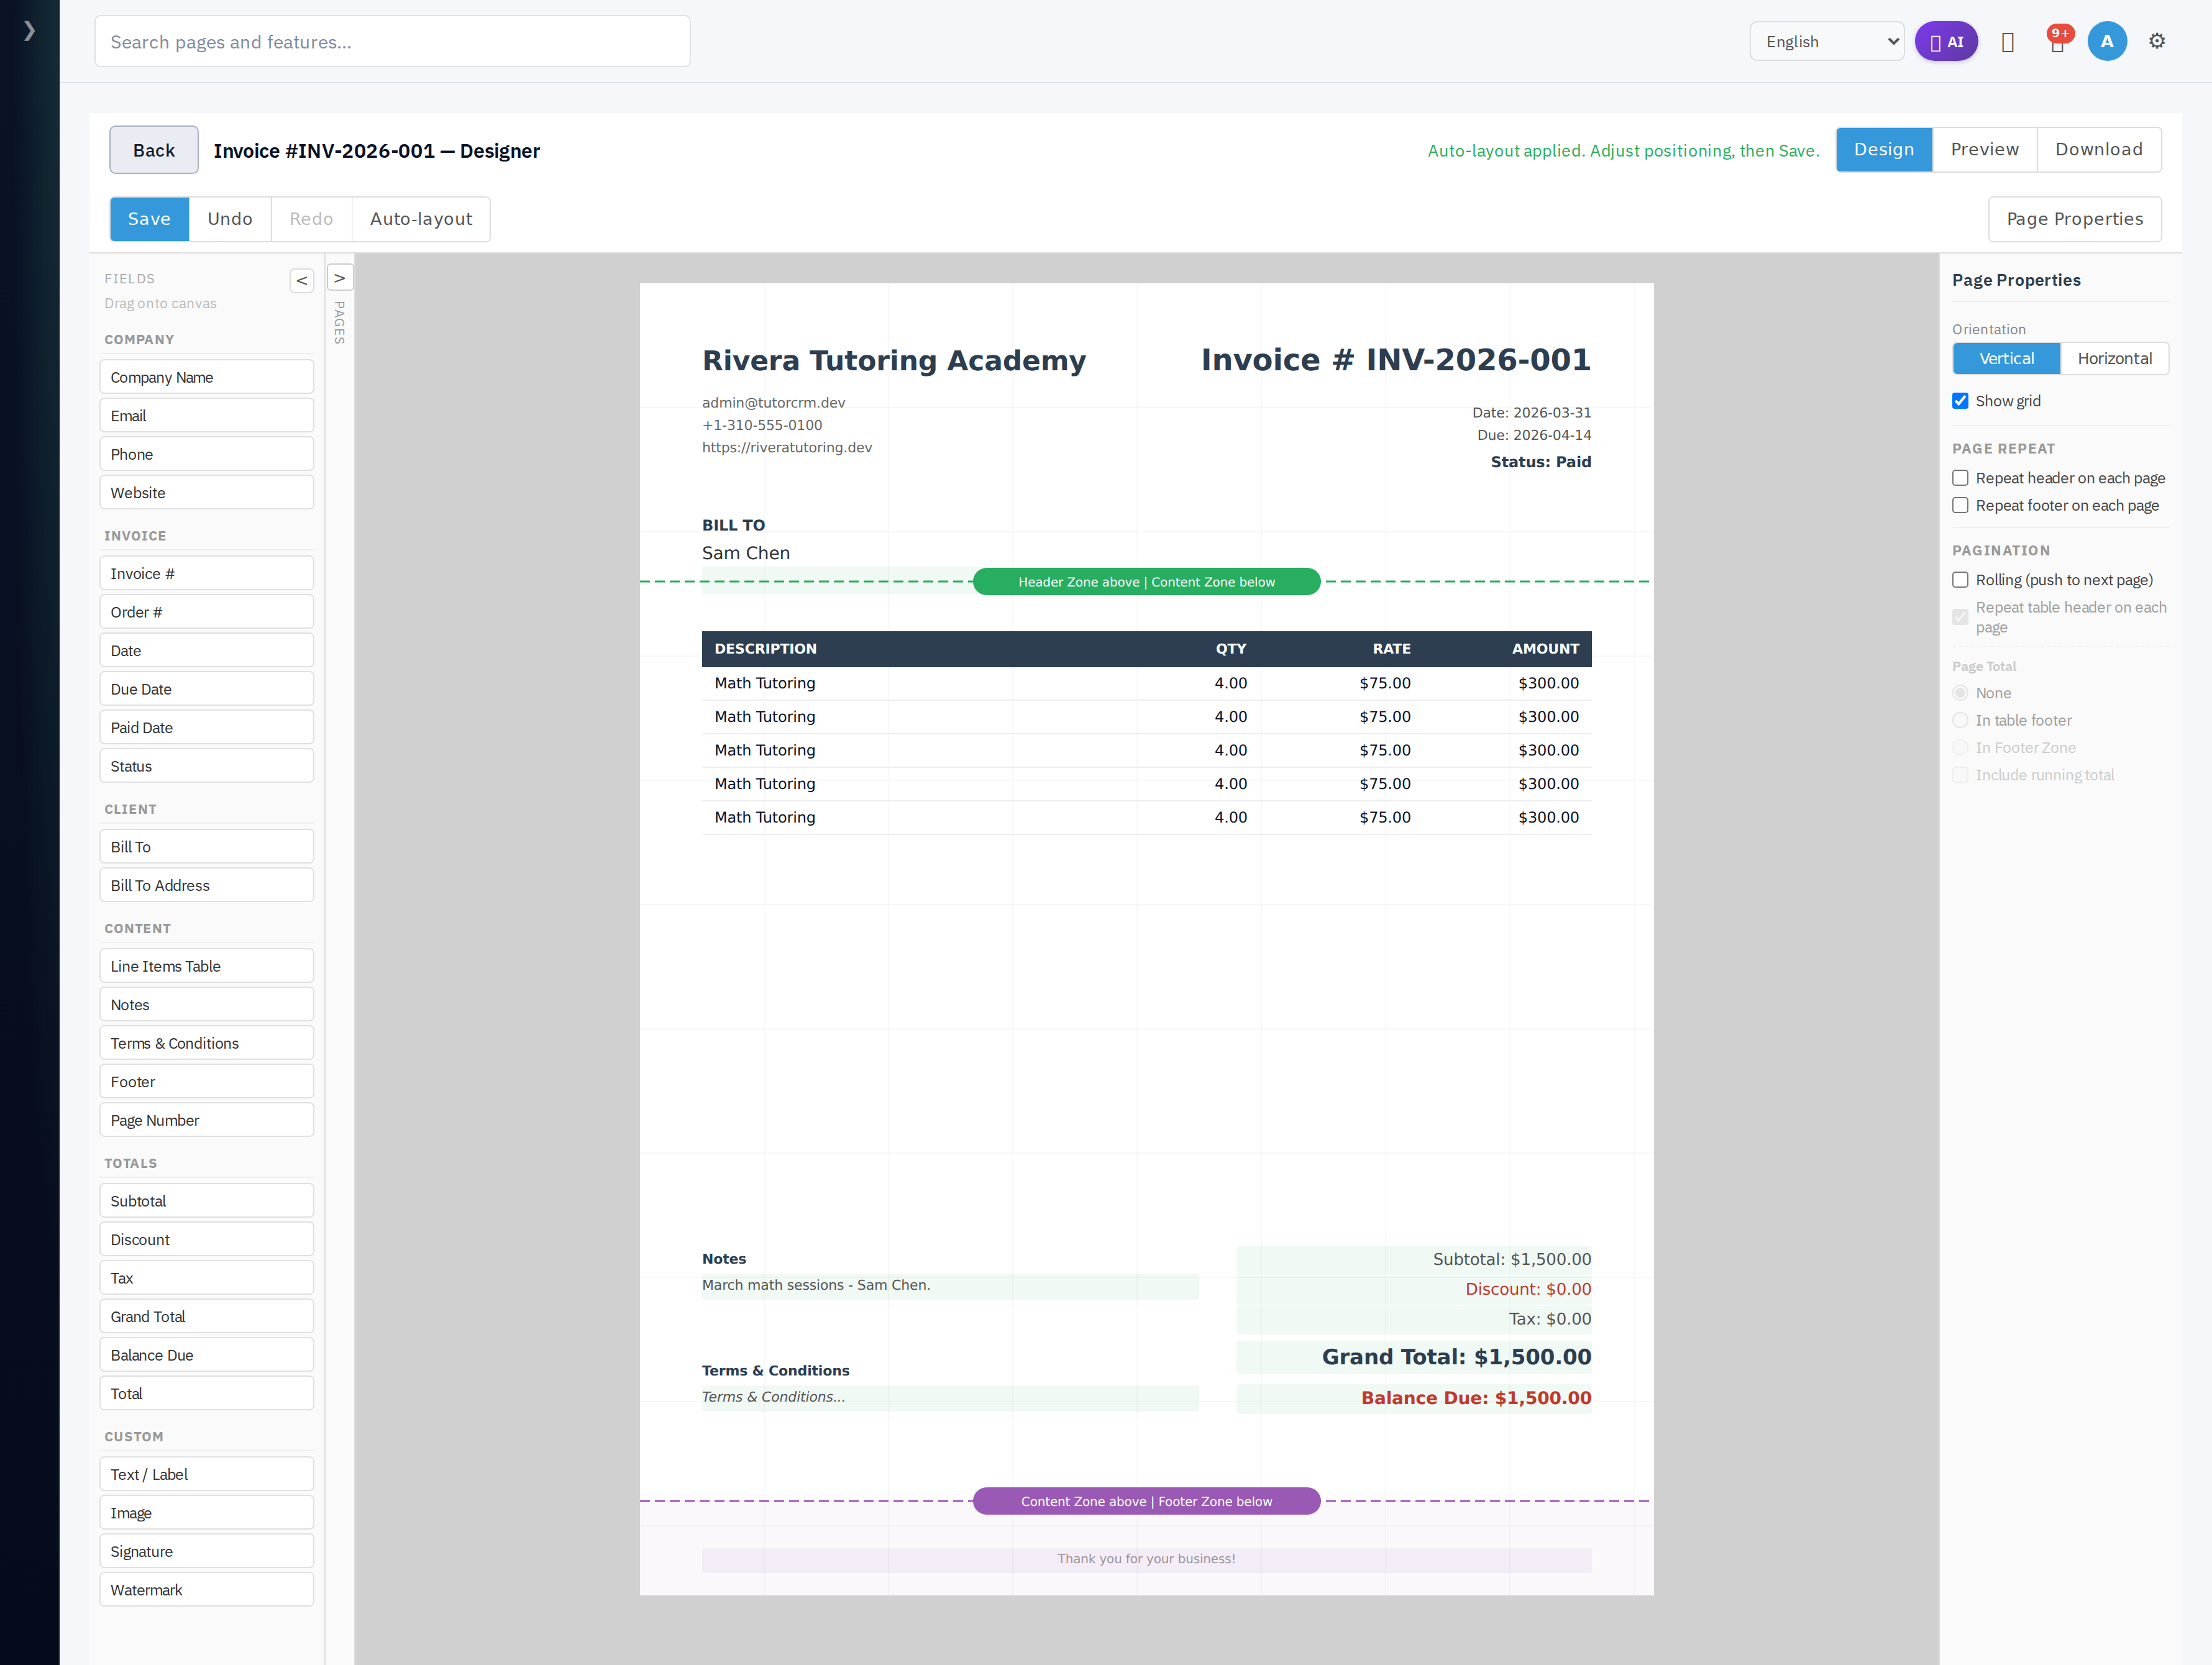
The Auto-layout button fills the canvas with a sensible default arrangement of the current document type's fields - a fast starting point you can then rearrange.
Fields you can drop
Fields are grouped by category (for an invoice):
- Company - Company Name, Email, Phone, Website (pulled from Settings -> Business Profile)
- Invoice - Invoice #, Order #, Date, Due Date, Paid Date, Status
- Client - Bill To, Bill To Address (when one or more clients are linked)
- Content - Line Items Table, Notes, Terms & Conditions, Footer, Page Number
- Totals - Subtotal, Discount, Tax, Grand Total, Balance Due, Total
- Custom - Text / Label (free text), Image (upload a logo or stamp), Signature, Watermark
A company logo is added with the Image field - there is no separate logo field. Other document types (payroll, expense, contract) swap in their own Company / data / content fields but keep the same Custom group.
Placing and styling fields
Drag a field from the panel onto the canvas. Once placed:
- Click to select it
- Drag to move
- Select it and use the block inspector (right panel) to style it
Select a block and the block inspector (right panel) exposes:
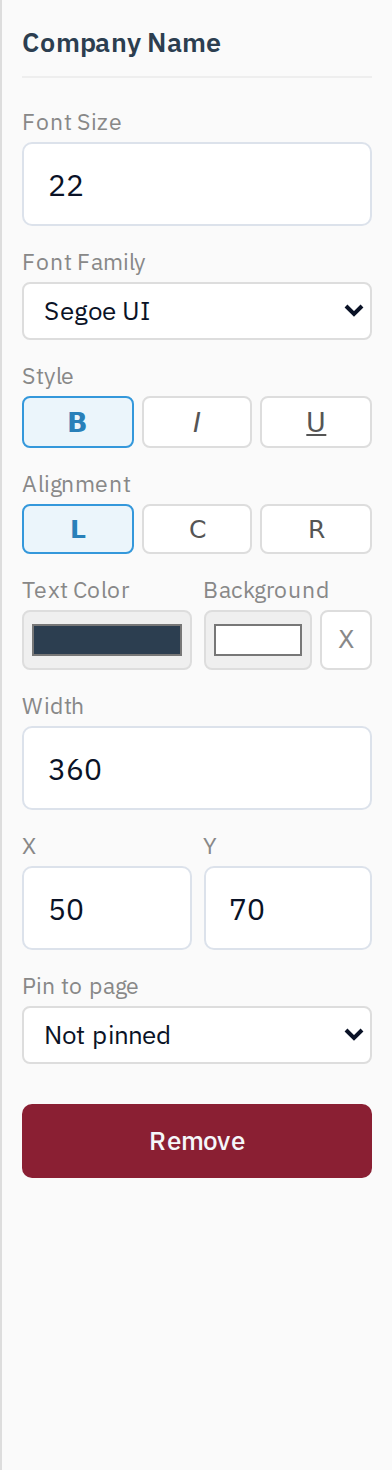
- Font Size and Font Family
- Style - Bold (B), Italic (I), Underline (U)
- Alignment - left, center, right
- Text Color and Background - colour pickers, with a clear (X) button to drop the background
- Width and X / Y - the block's size and position, in pixels
- Content - the text, for Text / Label blocks
- Pin to page -
Not pinned,First page only, orLast page only, for multi-page documents - Remove - delete the block
Styling is per block - there is no global theme or template-wide style.
Line items table
The Line Items Table is a configurable block:
- Columns - pick which columns show (text, description, dates, duration, quantity, rate, amount, and any formula columns)
- Group by - none, client, date, or a custom field, with optional per-group subtotals
- Sort - by a column, ascending or descending
- Subtotals and pagination - show a running subtotal and split the table across pages
- Repeat header / footer - keep the table header (and page header/footer) on every page
Formula columns
Line-item tables support formula columns - a column whose value is computed per row. Add one from the table's column configuration, enter an expression that references other line-item fields, and optionally set it to sum as a grand total in the footer. Expressions are validated before they are saved.
Grouping line items into sub-groups
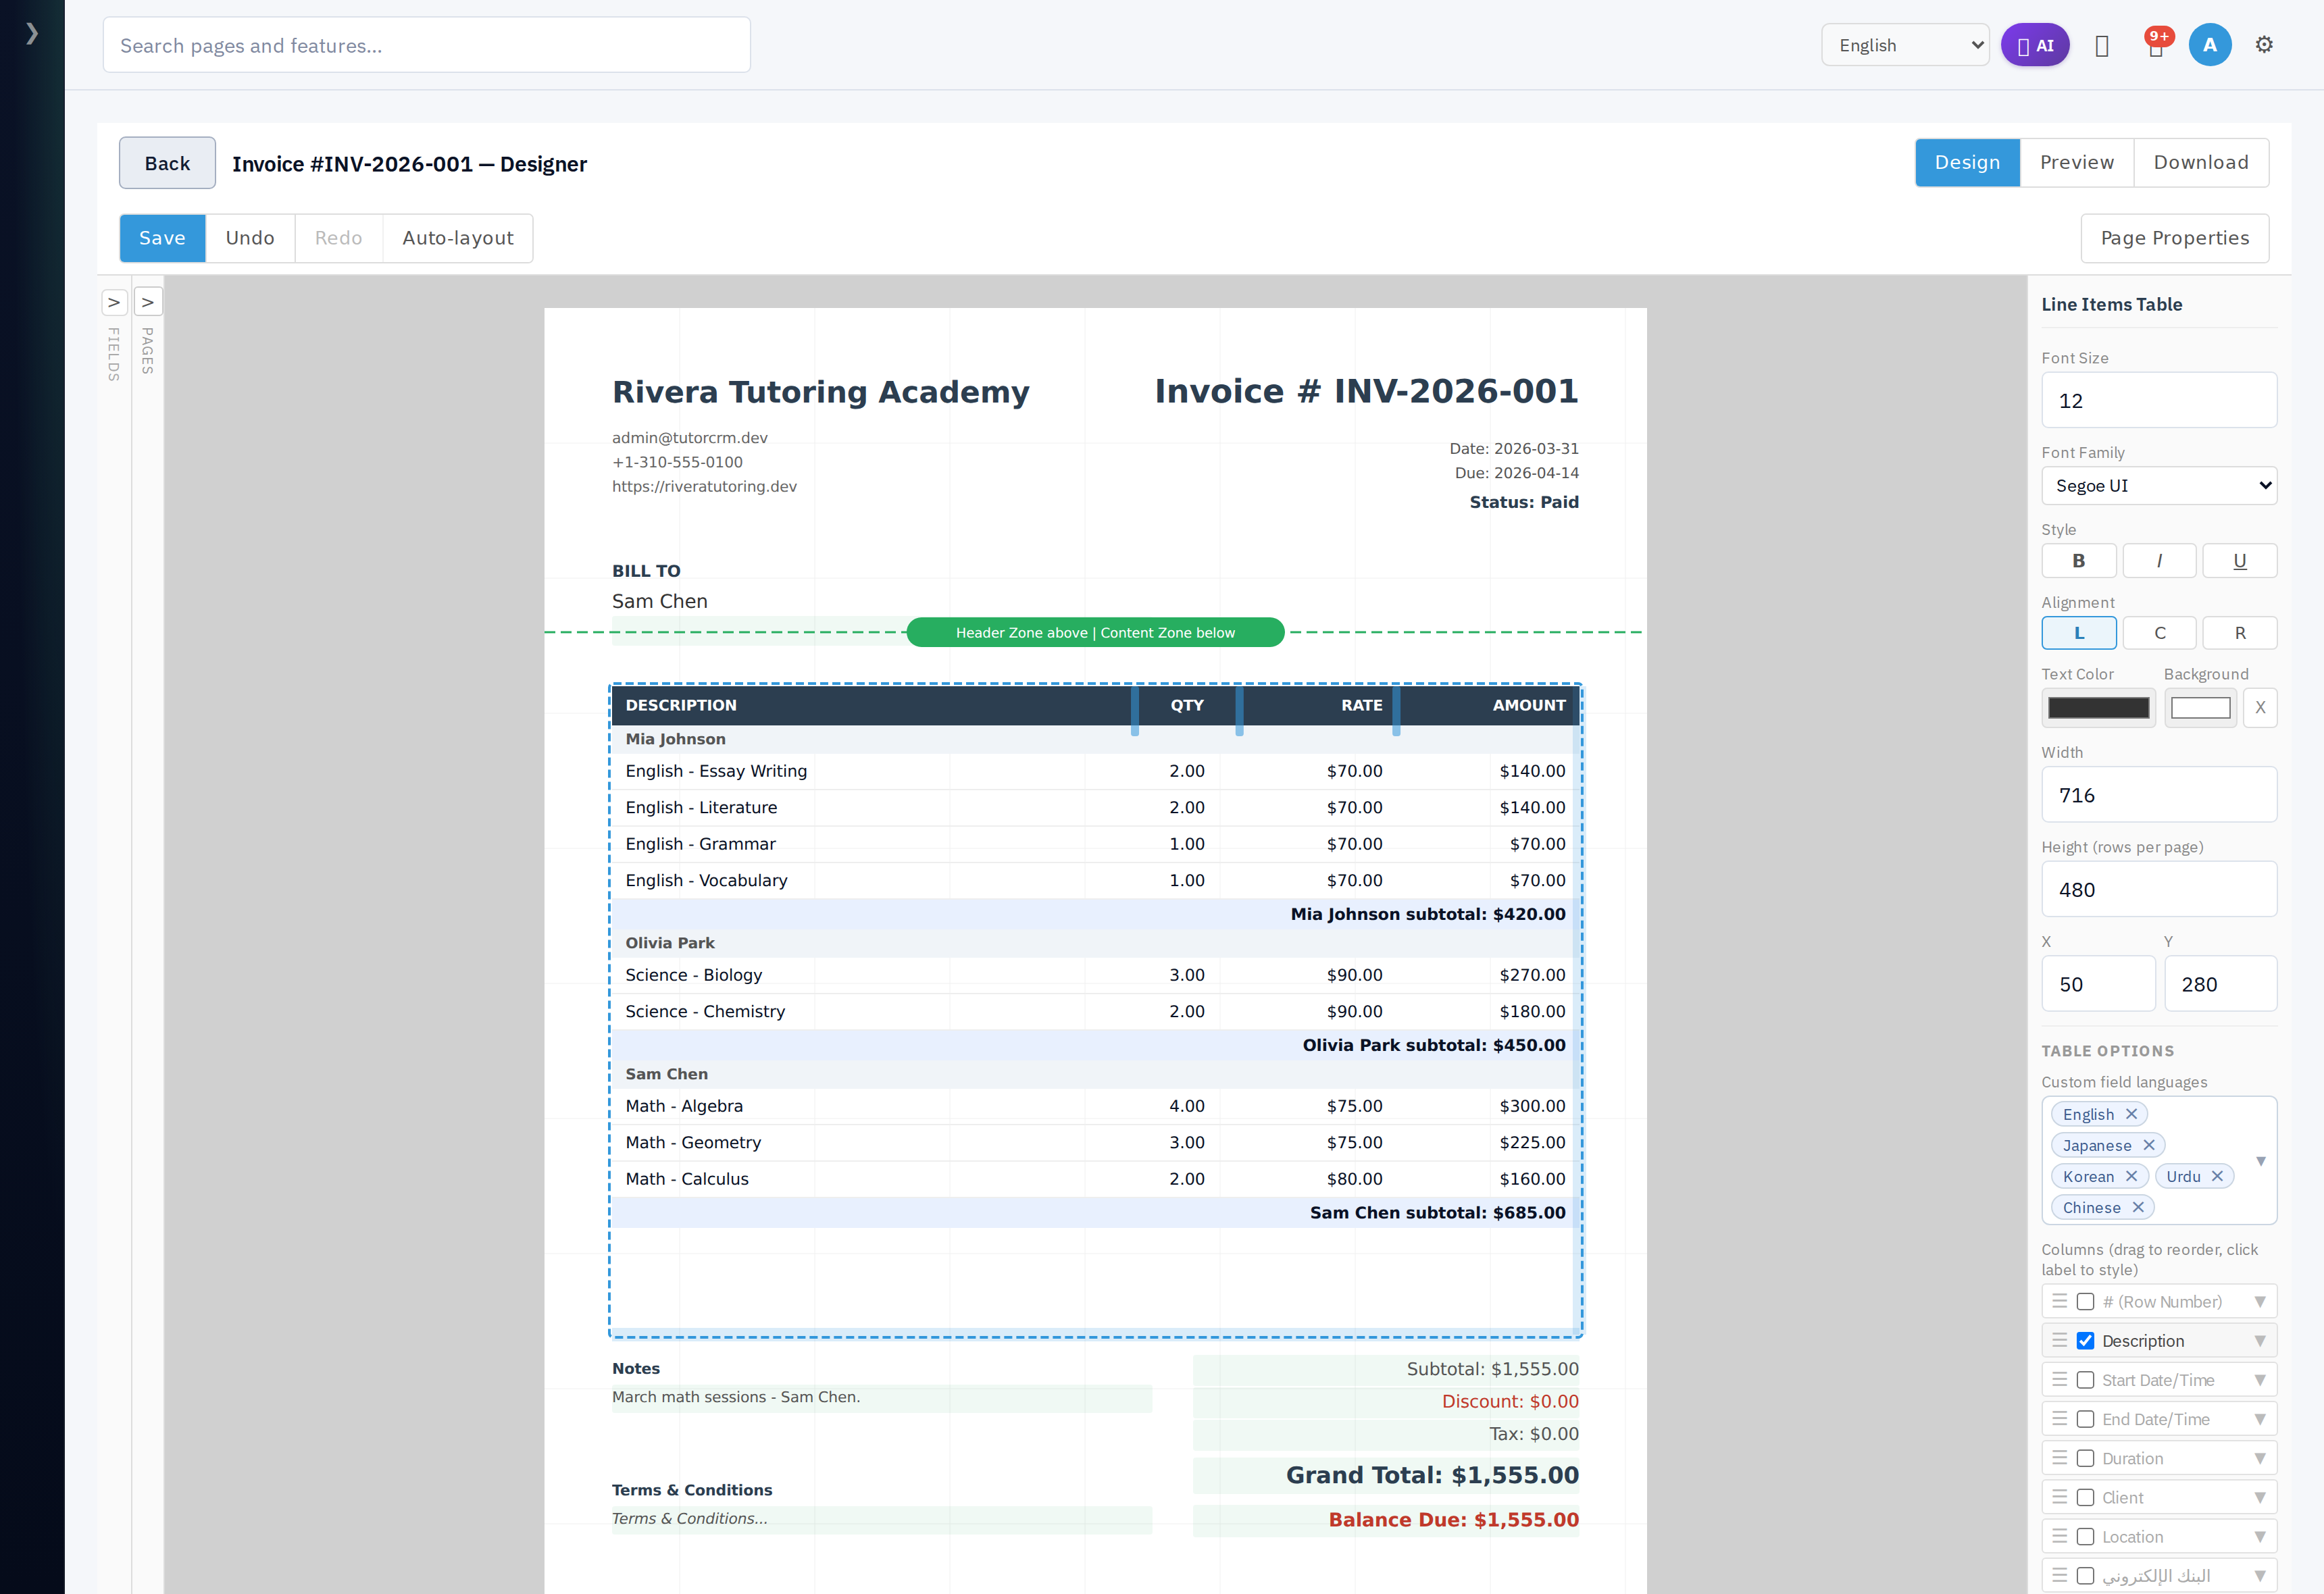
Select the Line Items Table and set Group by to turn a flat list into subtotalled sub-groups - a pivot over one shared attribute. Each distinct value becomes a sub-group with its own header row and subtotal.
Group by options: None, Client, Location, Item Type, Date, Fee Type, or Group Label.
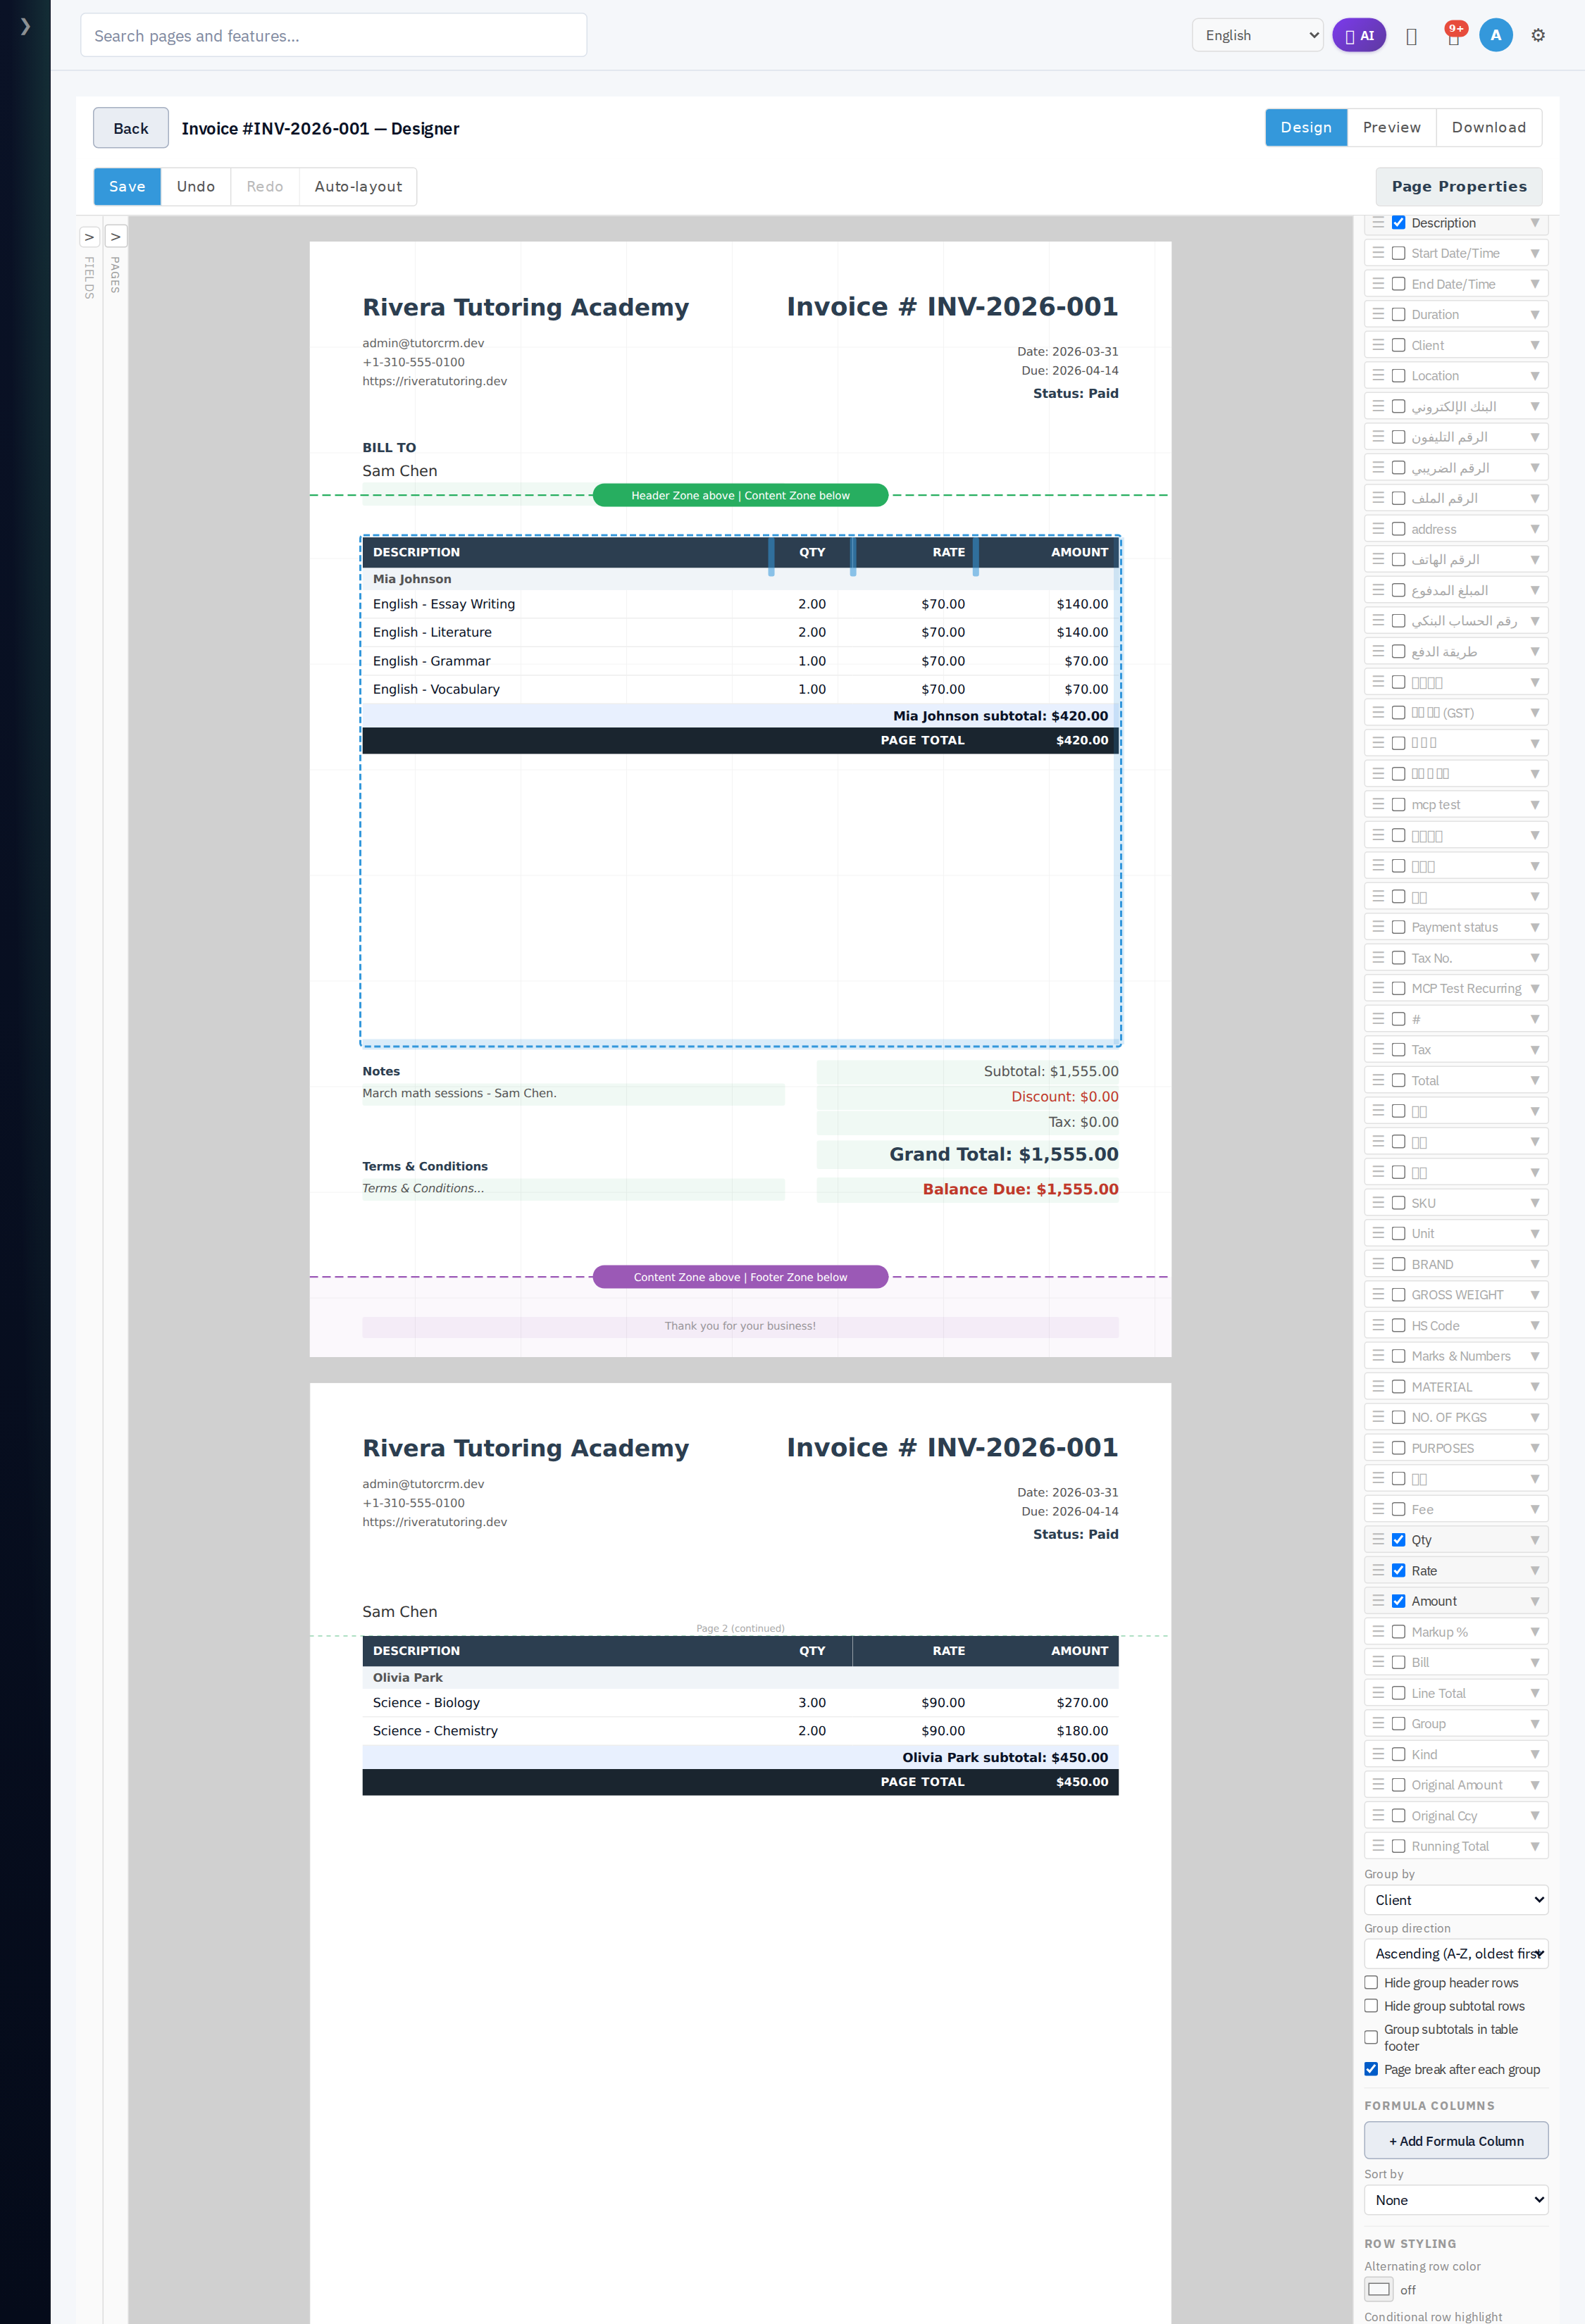
For example, a batch of tutoring sessions grouped by Client becomes one sub-group per student - each with a header row and its own subtotal, above the grand total:
The grouping controls sit on the Line Items Table's settings panel:
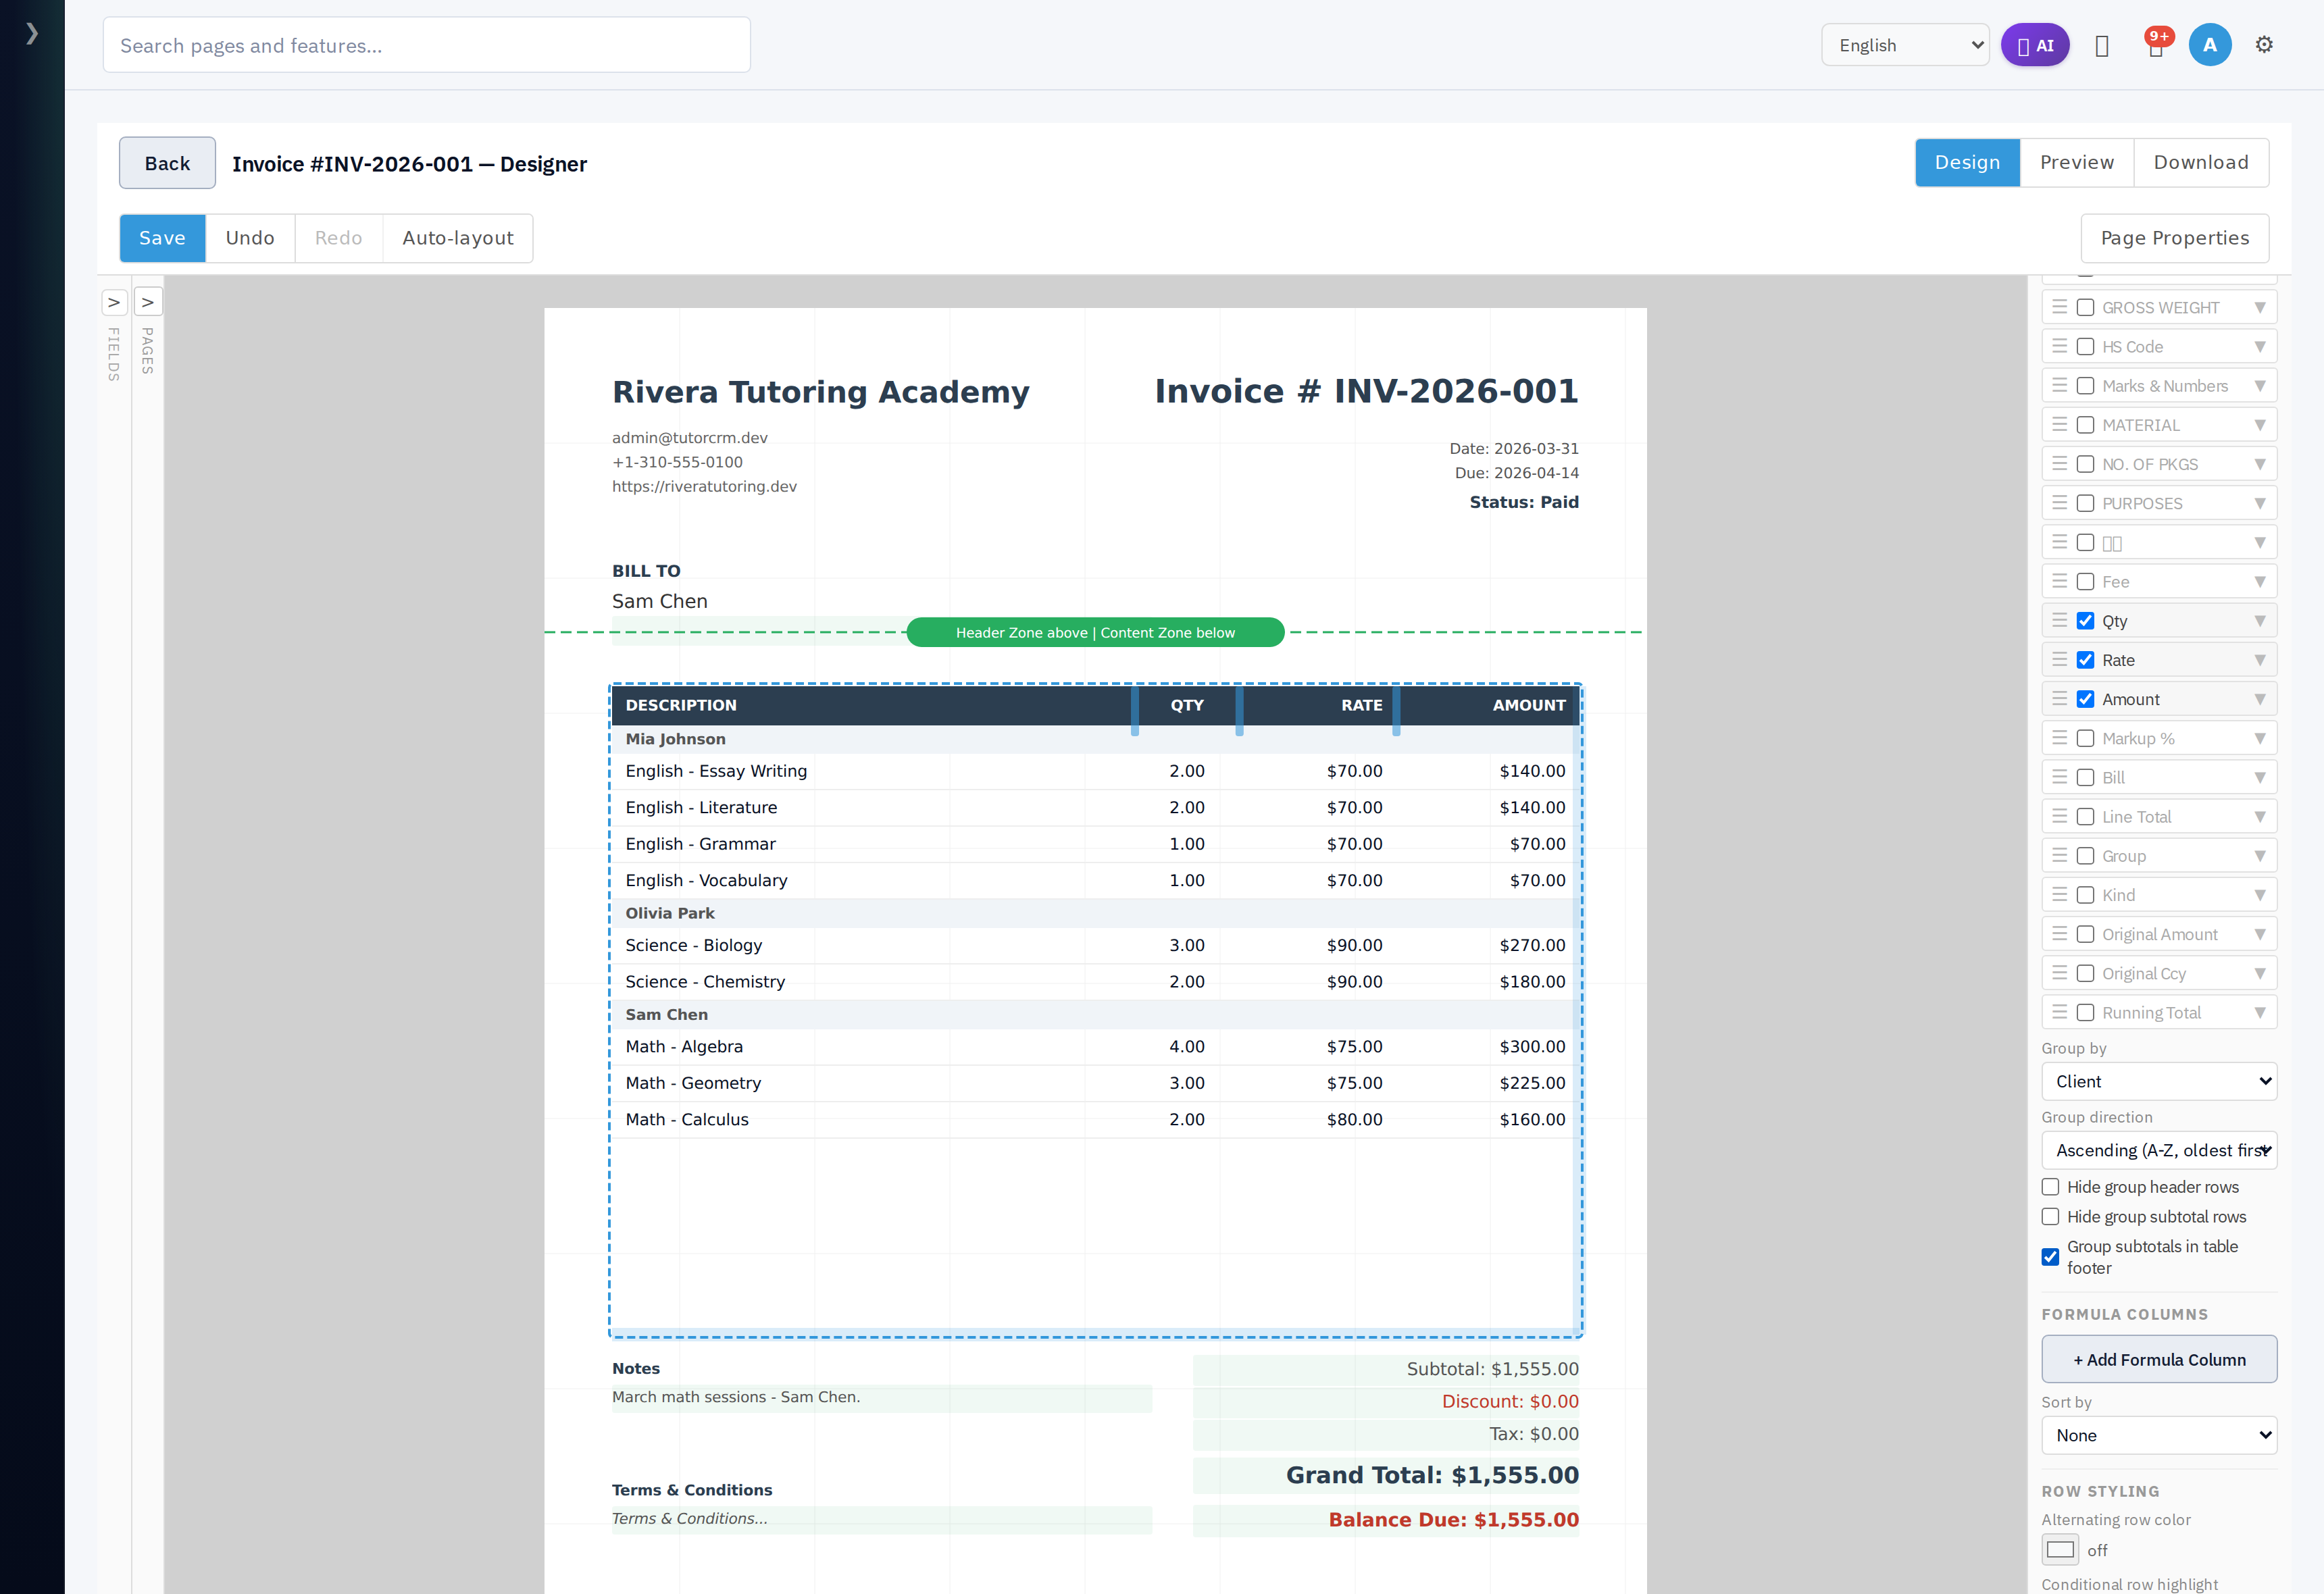
The flags that shape a grouped table (all on the Line Items Table's settings panel unless noted):
| Flag | What it does |
|---|---|
| Group by | The attribute to group rows on (Client / Location / Item Type / Date / Fee Type / Group Label). None = flat list. |
| Group direction | Order the groups Ascending (A-Z, oldest first) or Descending. |
| Hide group header rows | Drop the grey group-title rows, keeping the rows and subtotals. |
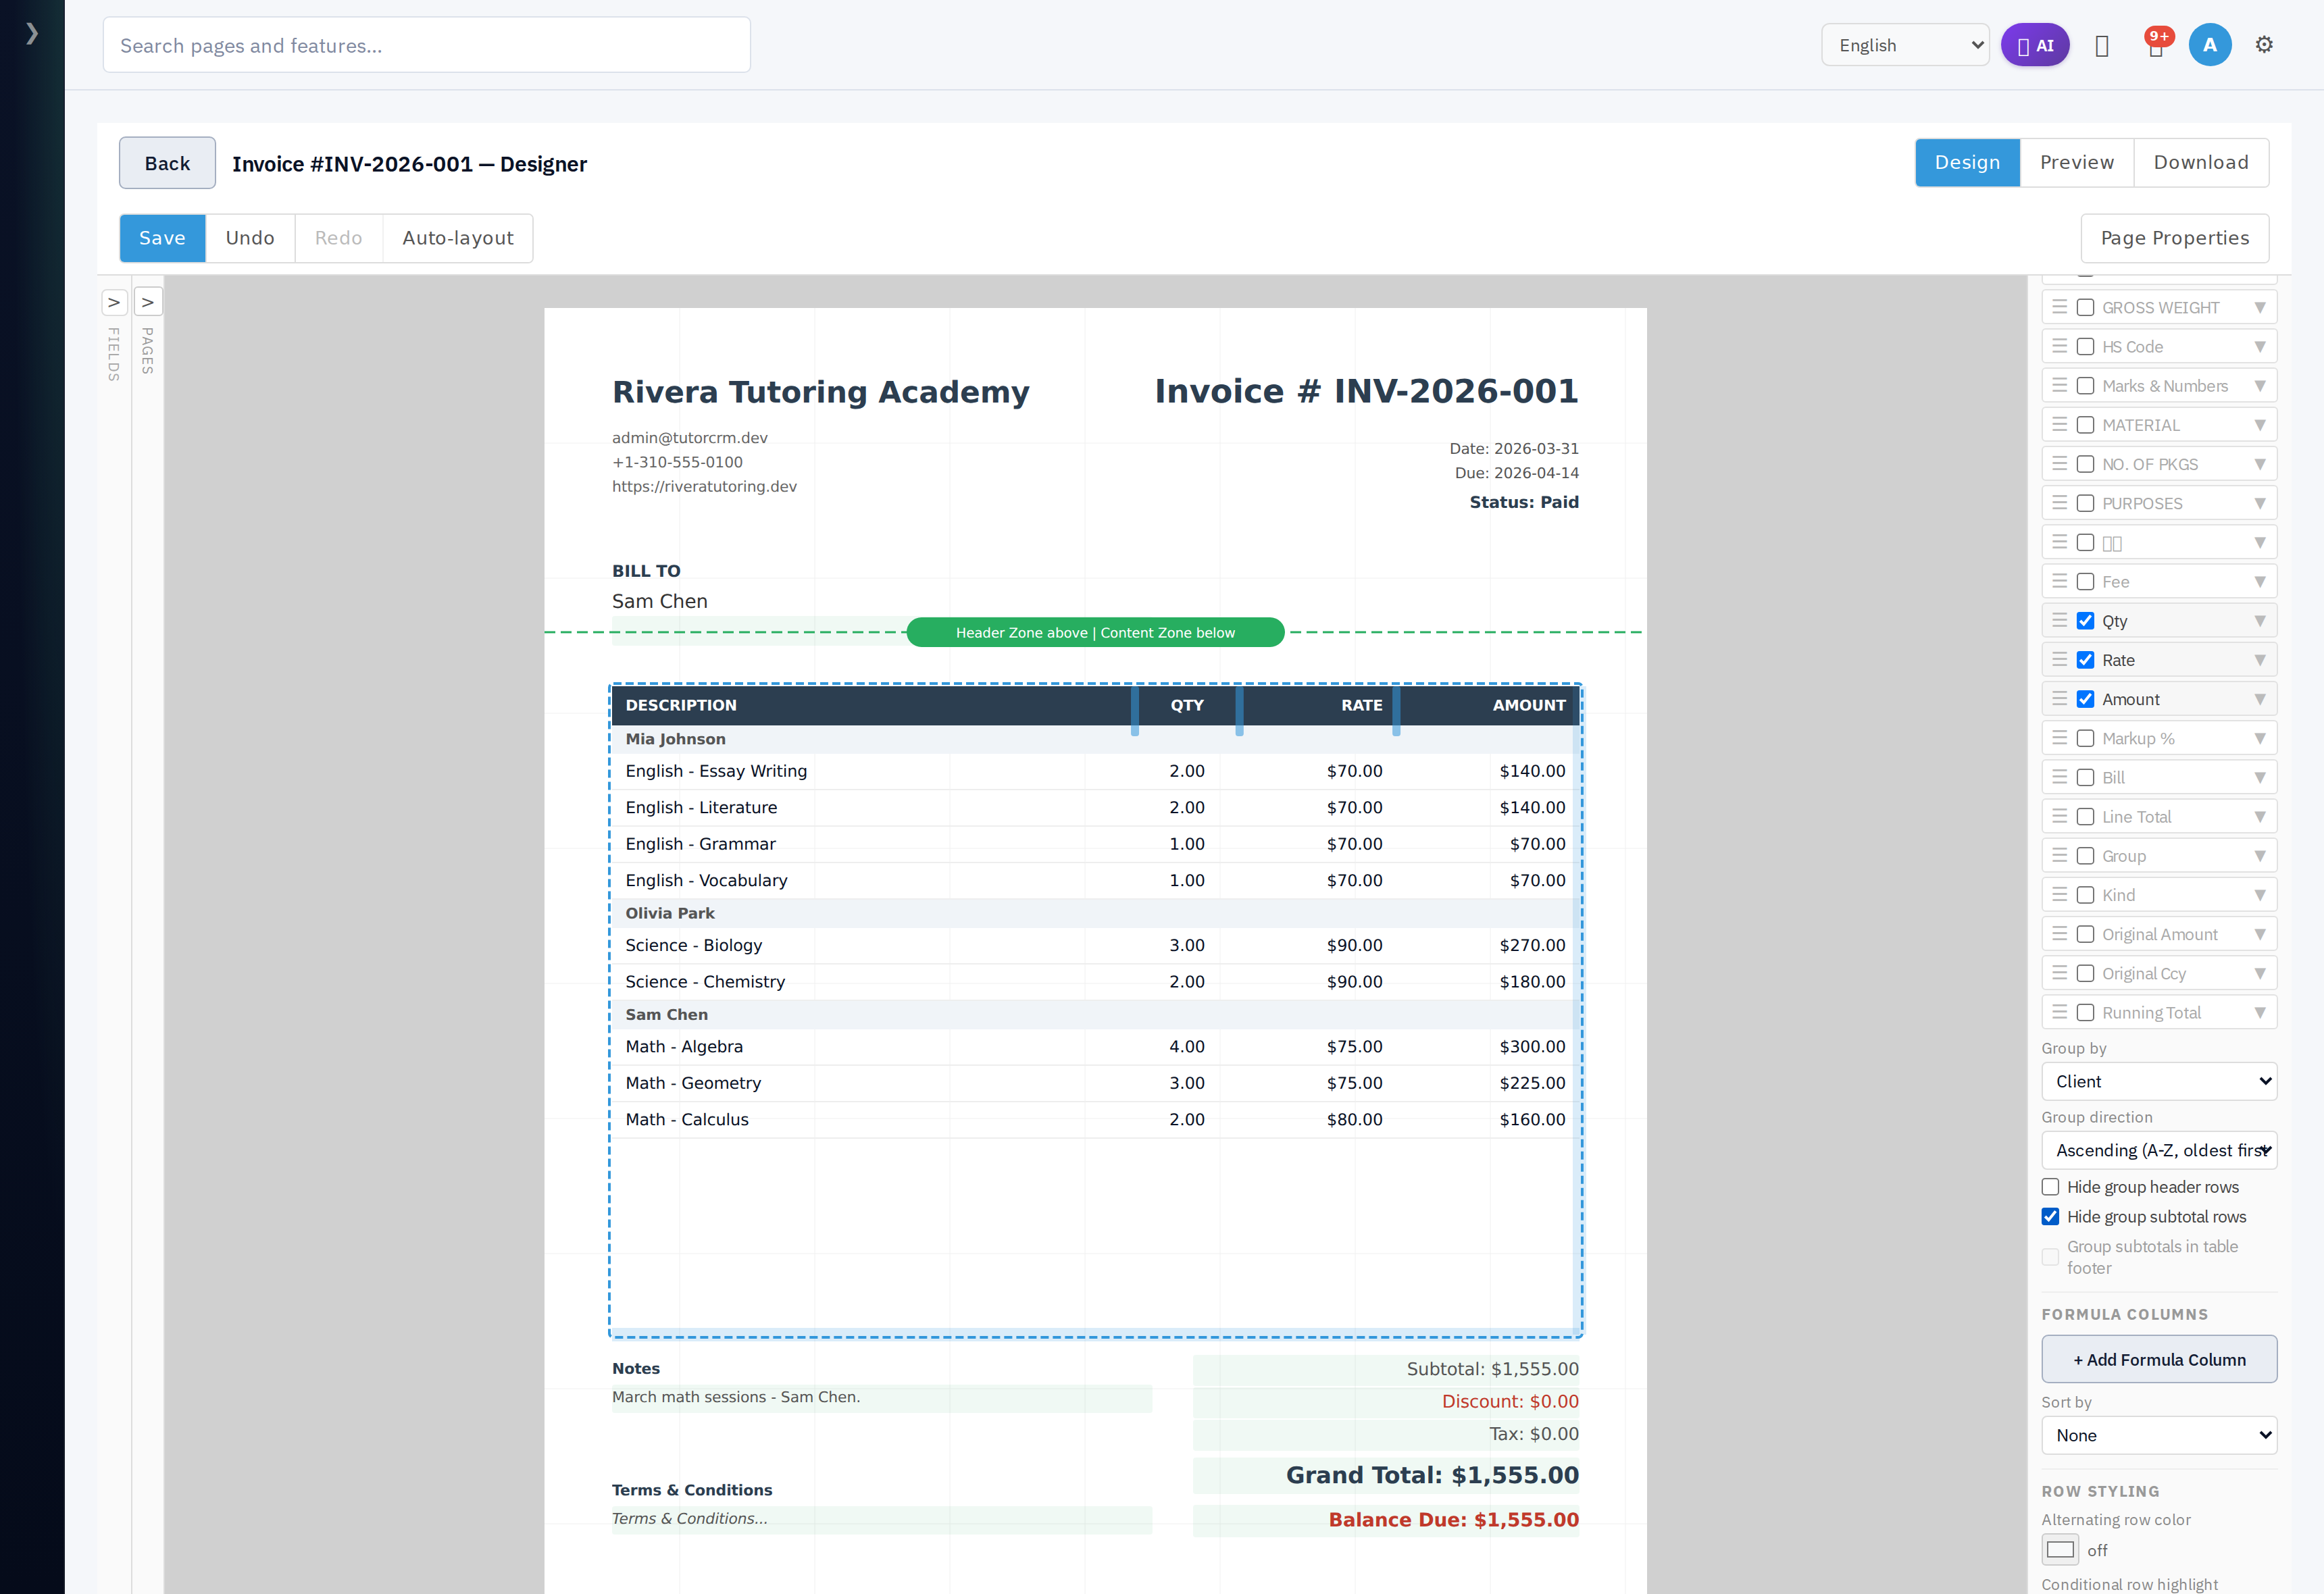
| Hide group subtotal rows | Drop the per-group subtotal rows. |
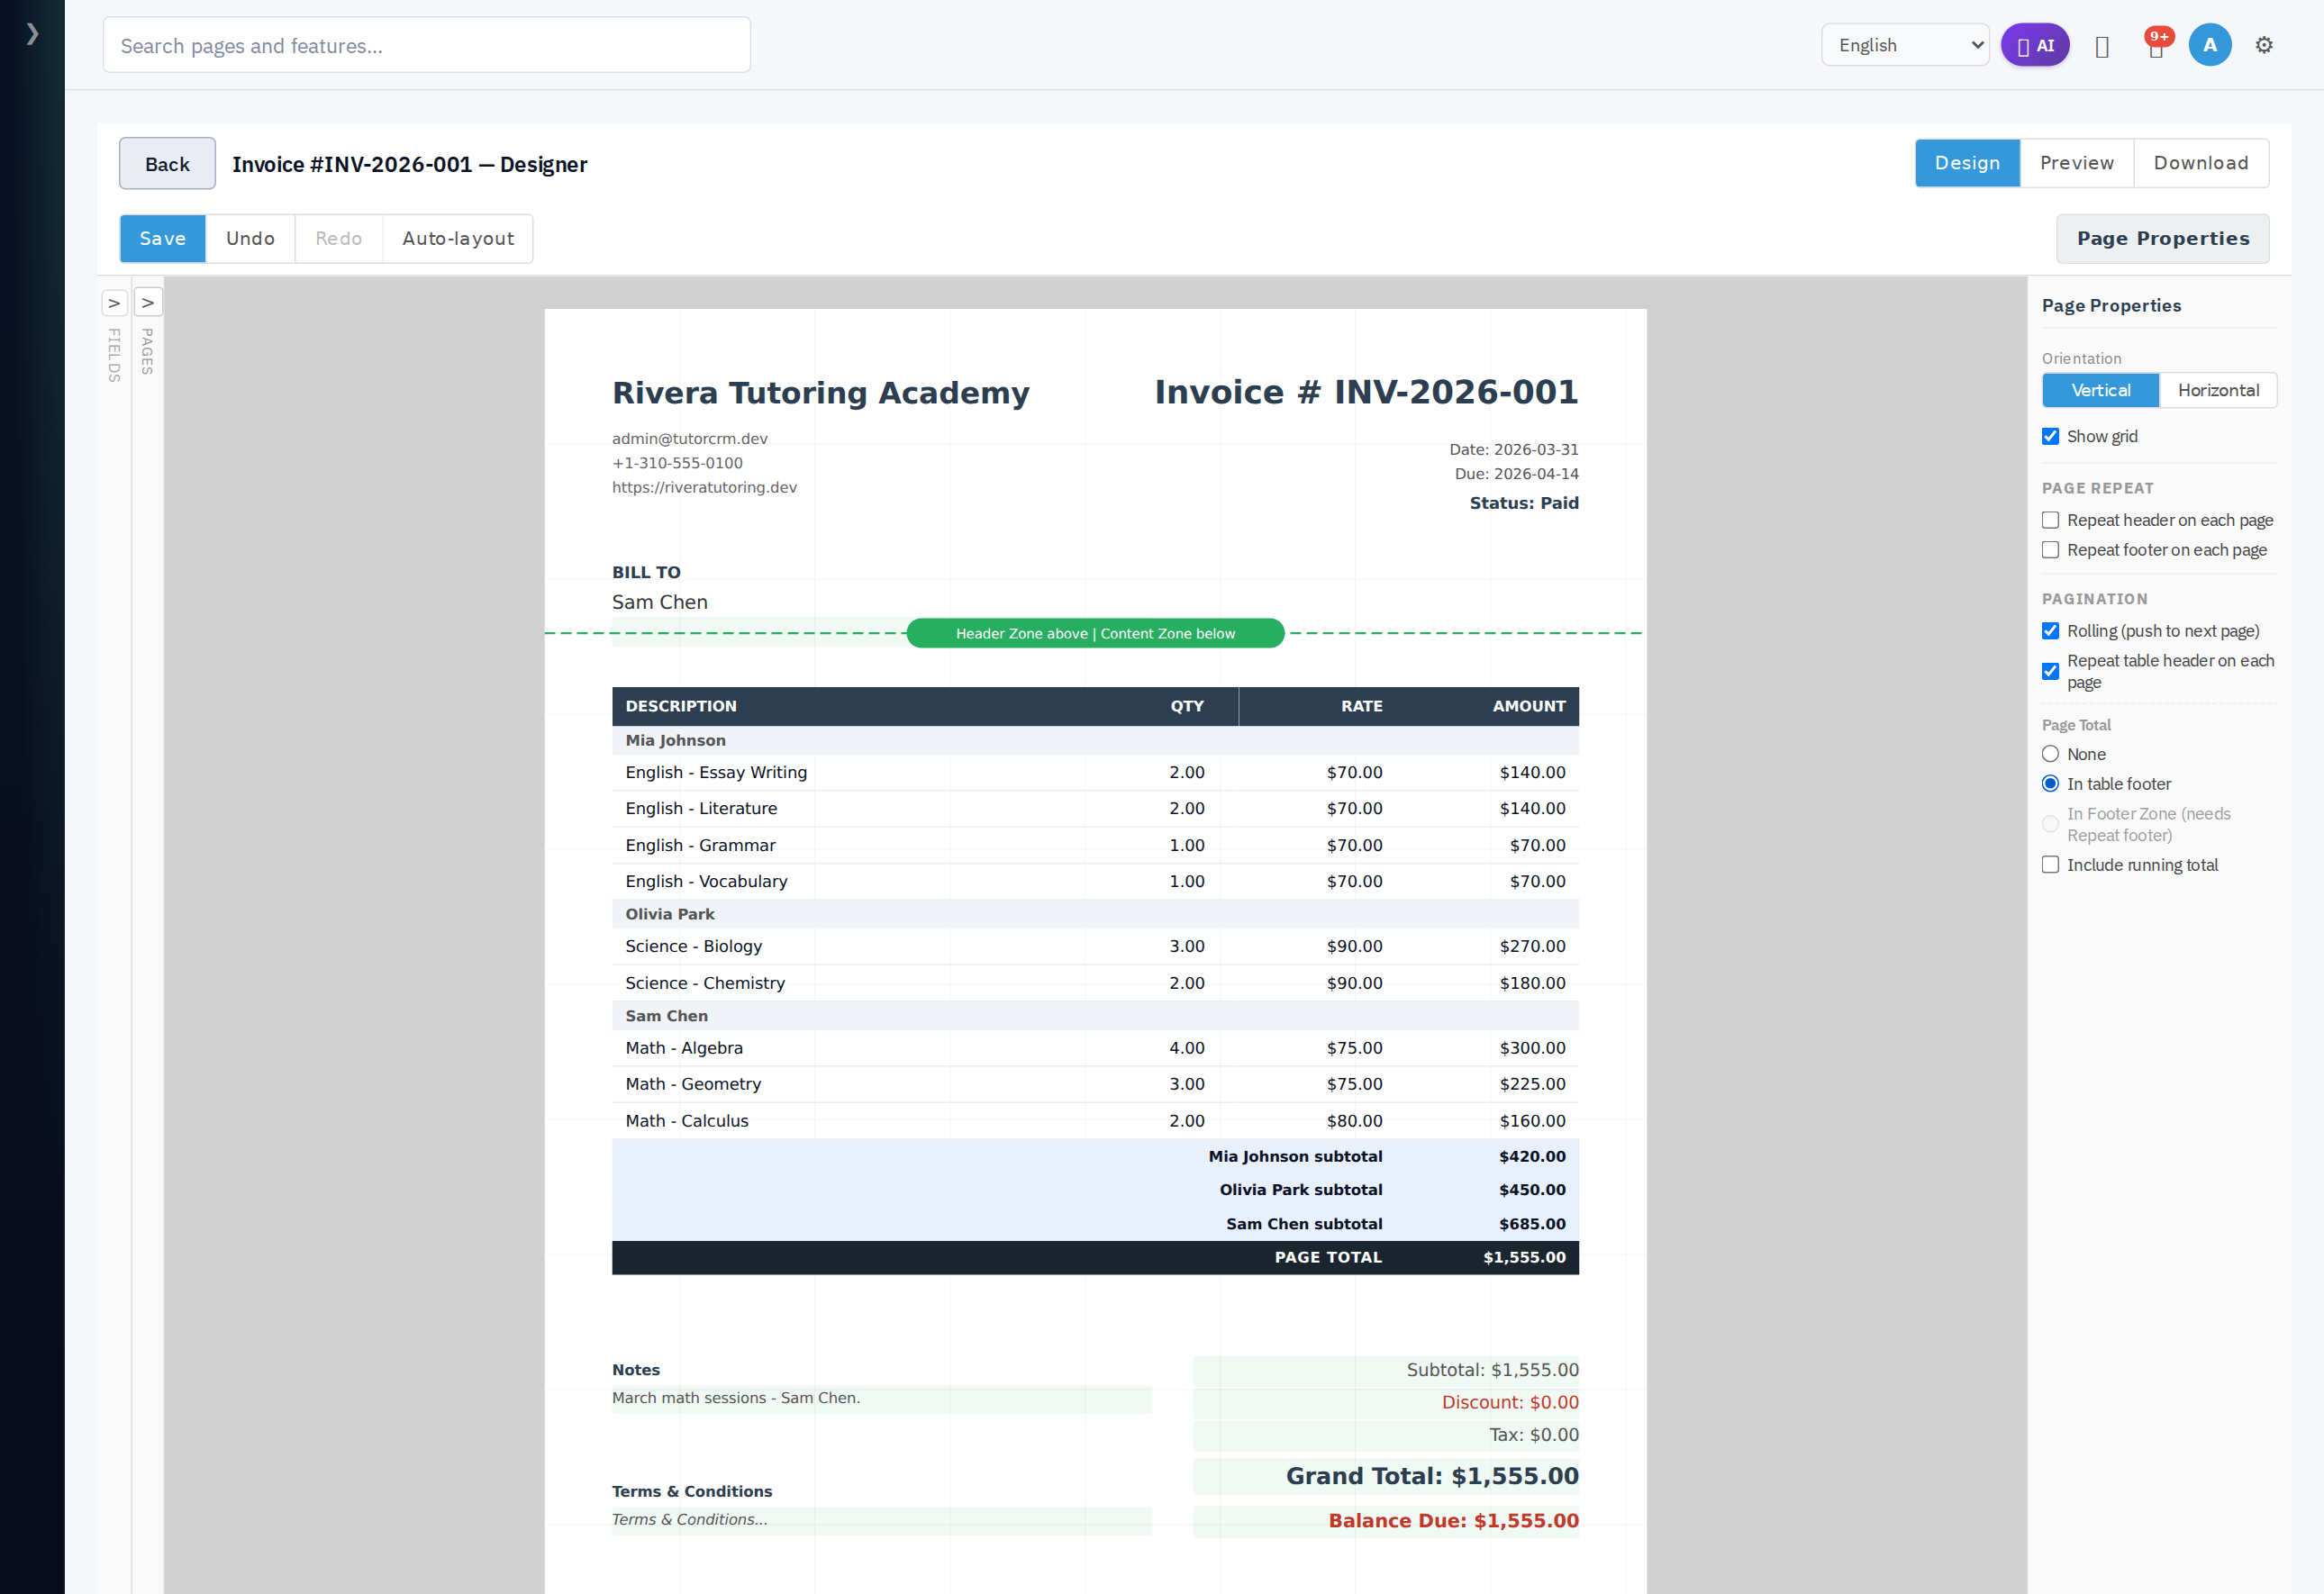
| Group subtotals in table footer | Move every group's subtotal out of the body and collect them together in the table footer. |
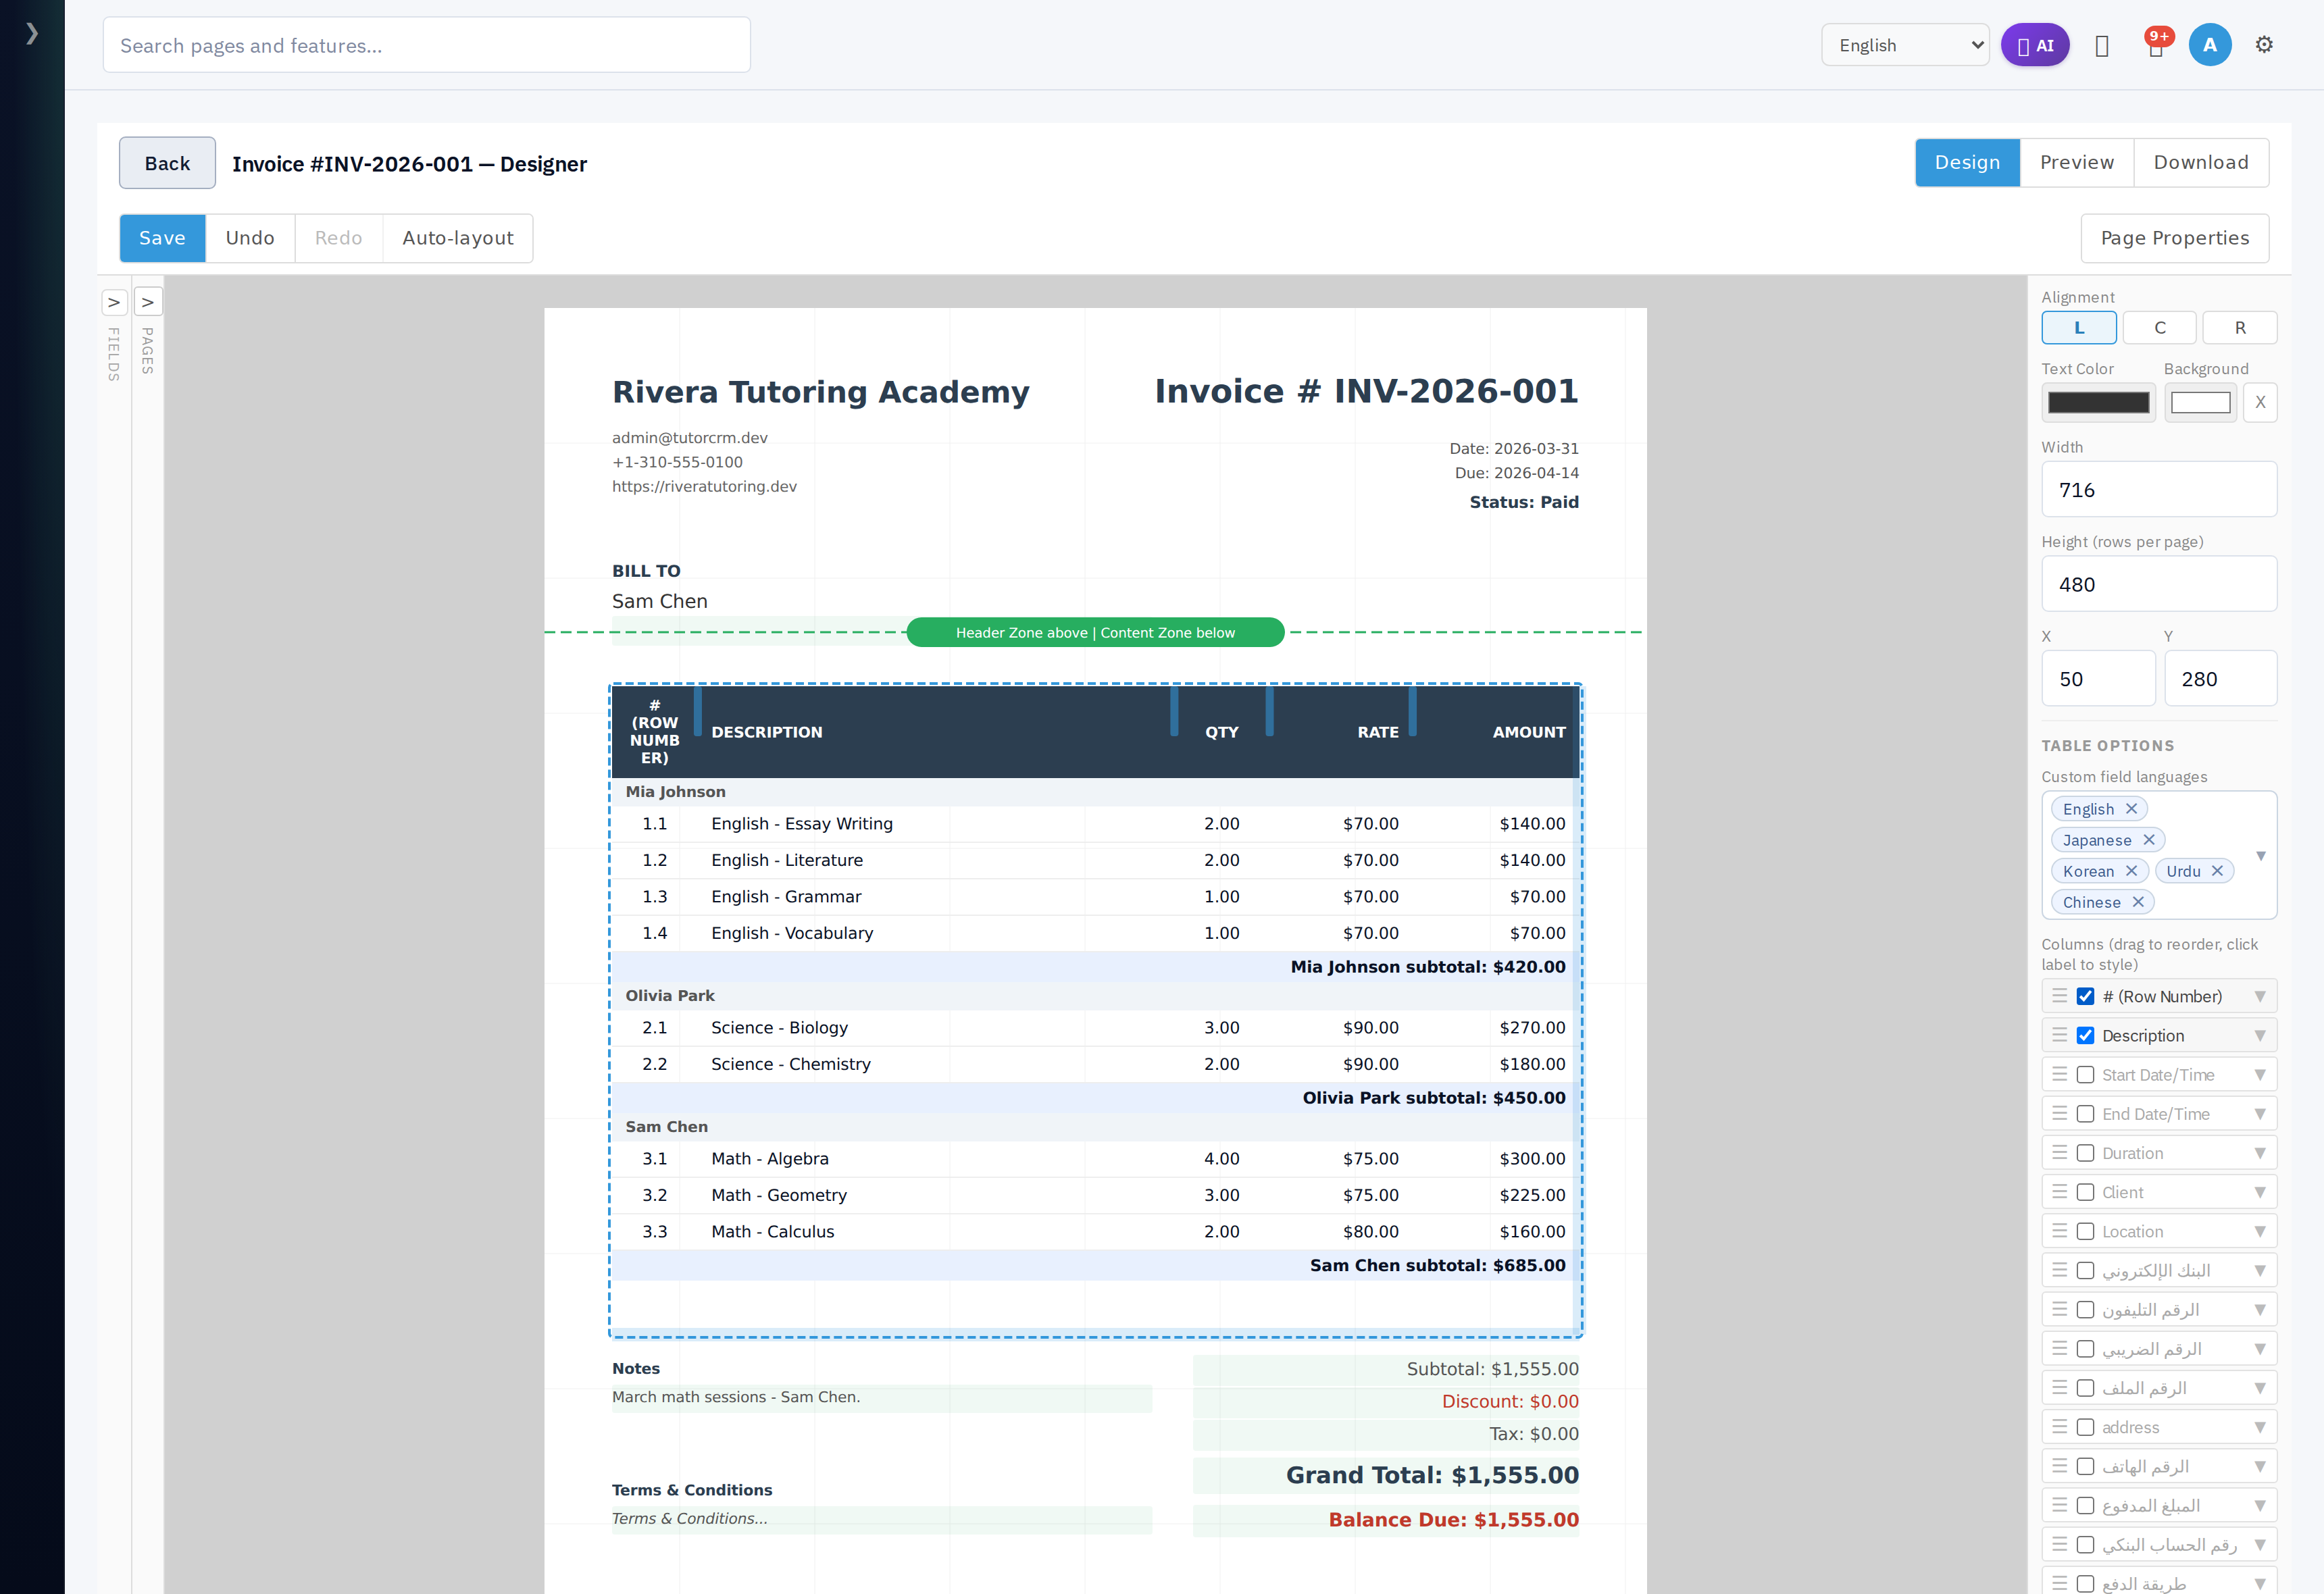
Grouped numbering (Numbering -> Grouped (1.1, 1.2, 2.1...)) | Number rows as group.row instead of a flat 1, 2, 3. |
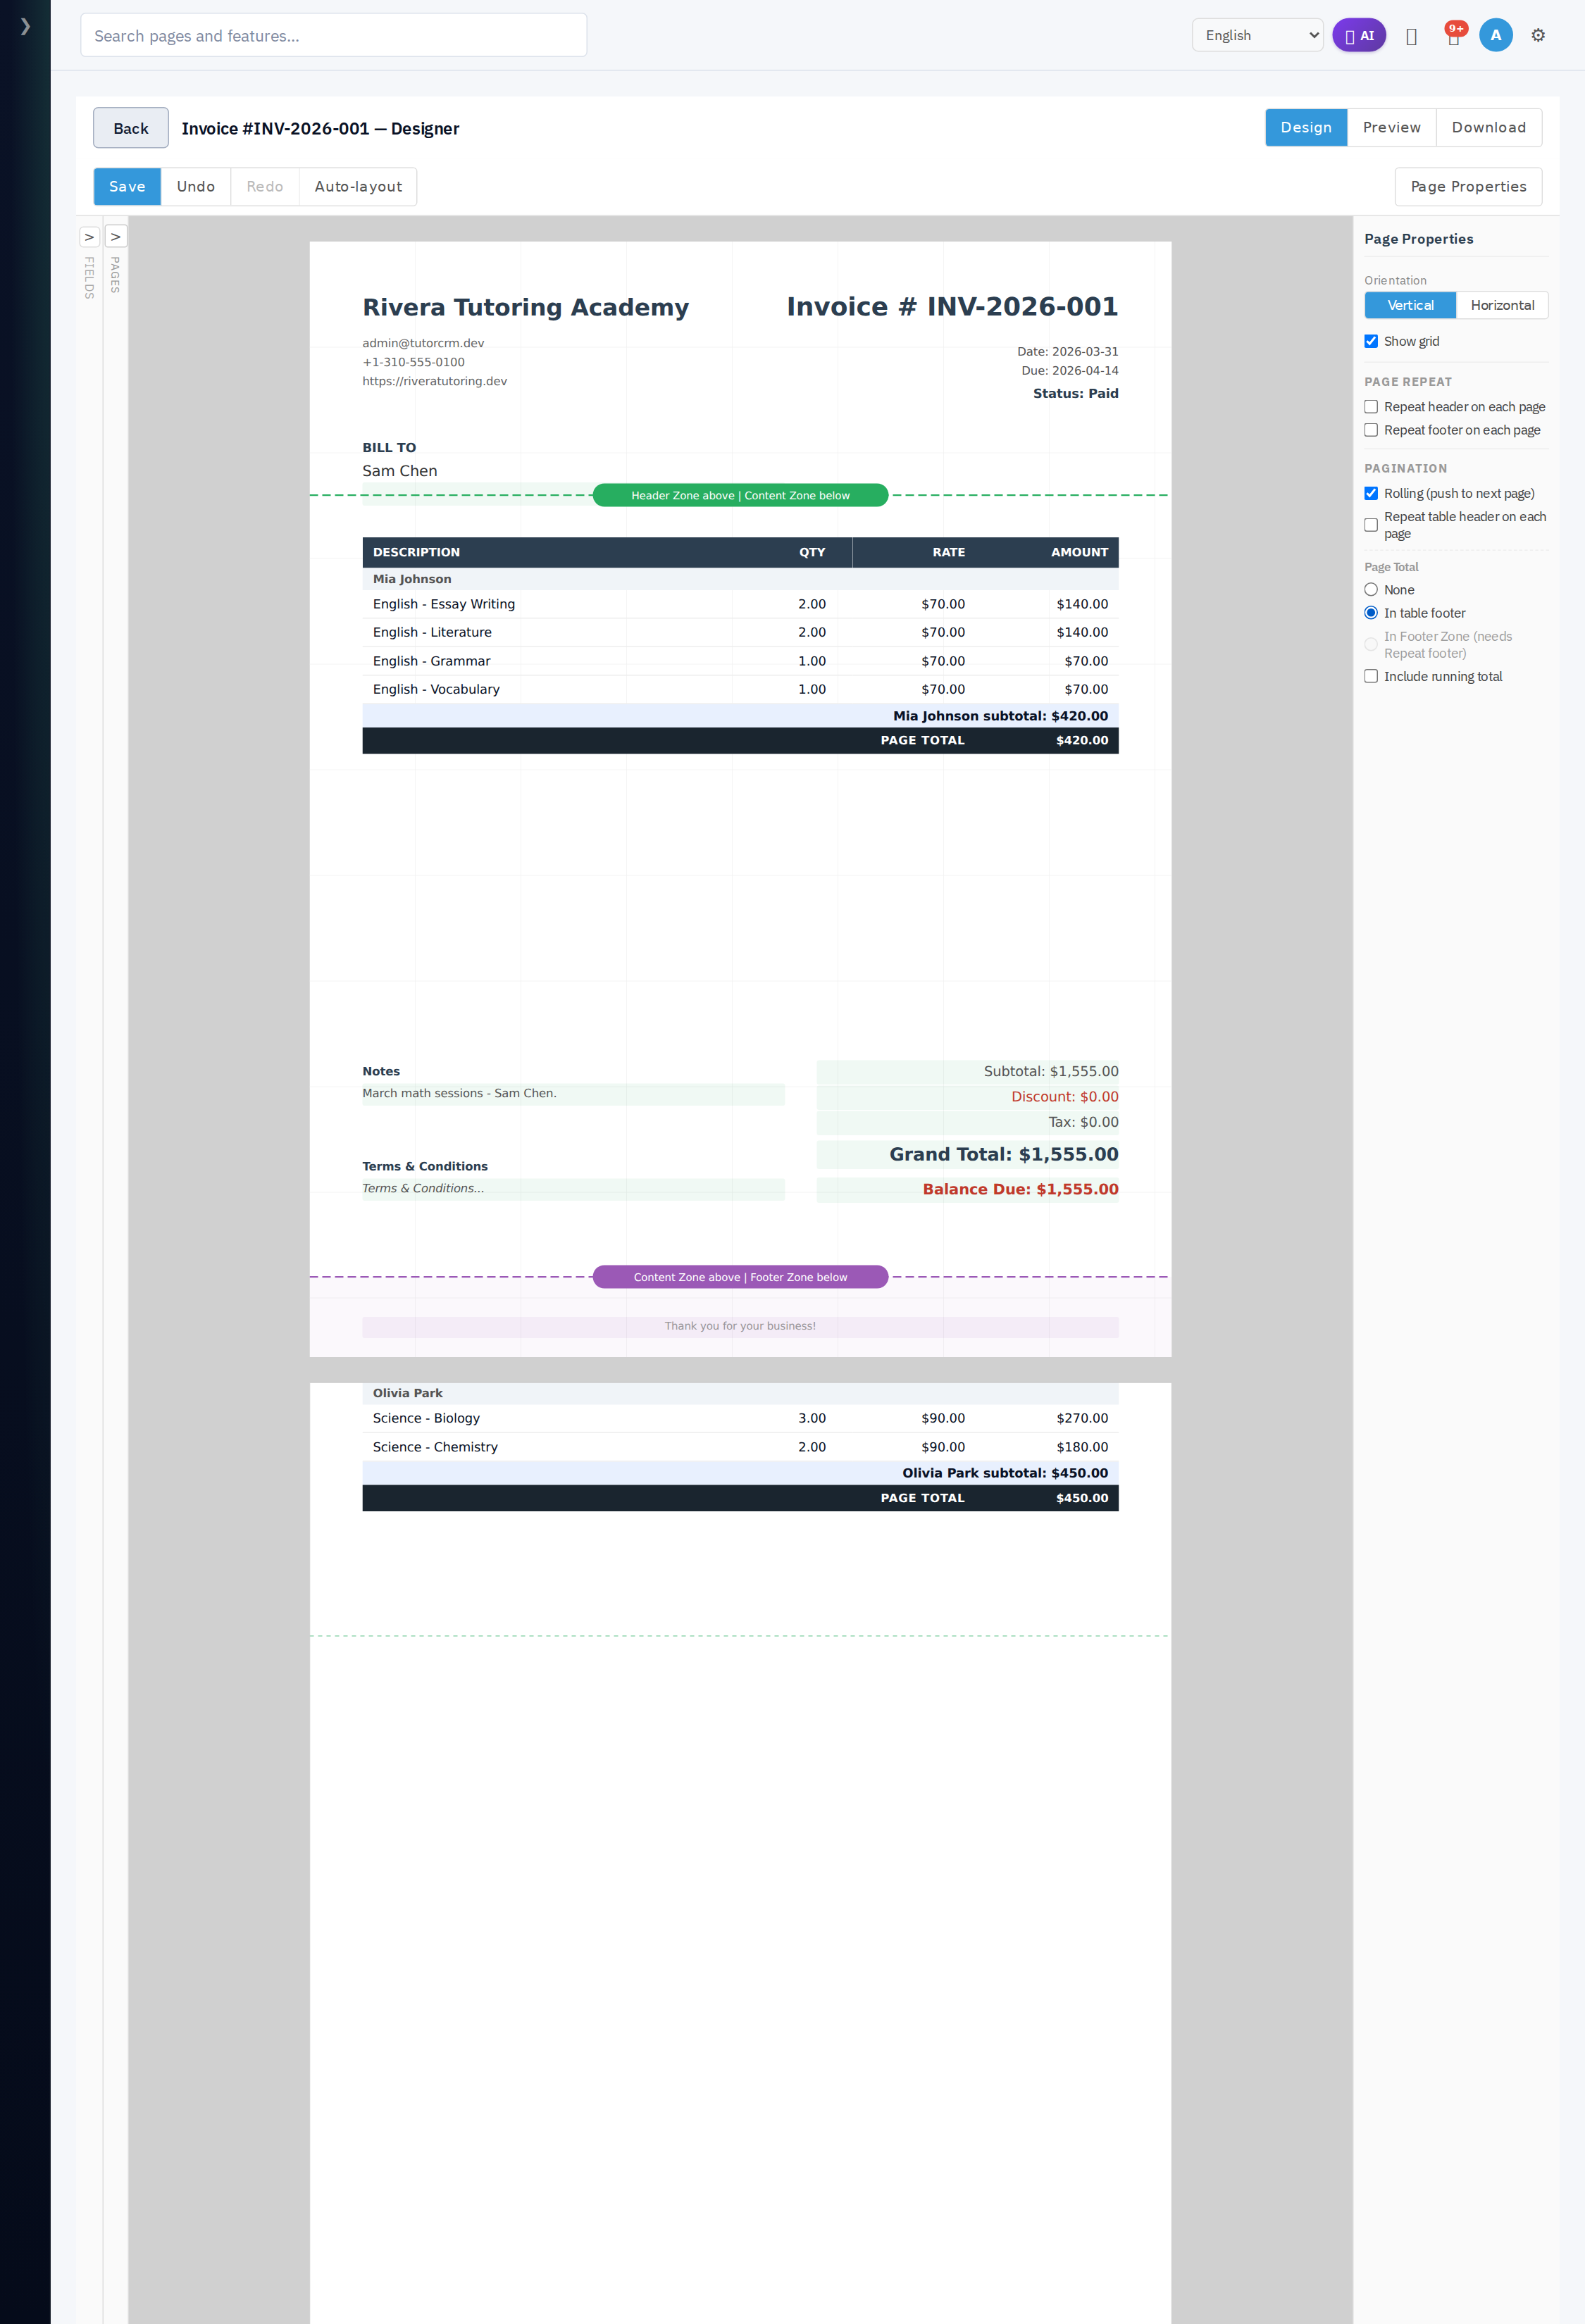
| Page break after each group | (needs Group by + Rolling pagination) Start each sub-group on a fresh page. |
Grouped numbering turns the row numbers into group.row (enable the # (Row Number) column - its Auto format renders 1.1, 1.2, 2.1... once the table is grouped):
Hide group subtotal rows keeps the group headers but drops each group's subtotal row:
Group subtotals in table footer moves every group's subtotal out of the body and collects them together at the bottom of the table. It needs the table footer to be shown, so set Page Total to In table footer (under Pagination) as well:
Grouping also respects Sort by / Direction, and the Row Styling controls (alternating row colour, and a conditional highlight for negative/positive amounts).
Pagination
When a table is taller than one page - or when Page break after each group is on - pagination controls (in Page Properties) decide how it flows. Below, each client sub-group starts a fresh page (Rolling + Page break after each group) and each page prints its own PAGE TOTAL. Note page 2 (Olivia Park) here has no header - that is the gotcha below:
Gotcha: pages after the first can look "headerless"
Pagination only carries the overflow rows onto the next page. With Repeat header on each page and Repeat table header on each page left off, page 2 onward show no company header and no column-header row, so the table appears to start at the very top of the page (where a header would sit). The table has not moved into the header zone - there is simply nothing repeated above it.
Turn both repeat flags on and every page carries the company header, a "Page N (continued)" marker, and the column header:
The pagination controls (in Page Properties):
| Flag | What it does |
|---|---|
| Rolling (push to next page) | Overflow rows continue onto additional pages instead of being clipped at the page edge. |
| Repeat table header on each page | Repeat the column-header row at the top of every page the table spans. |
| Page break after each group | With grouping on, forces each sub-group to start a new page (set on the table panel). |
| Page Total | Where per-page totals print: None, In table footer, In Footer Zone, or Include running total (carry-forward across pages). |
The page Repeat header / Repeat footer on each page flags (also in Page Properties) repeat your header and footer zones - not the table header - on every page.
Page properties
With nothing selected (or via the Page Properties button), the right panel shows page-level settings:
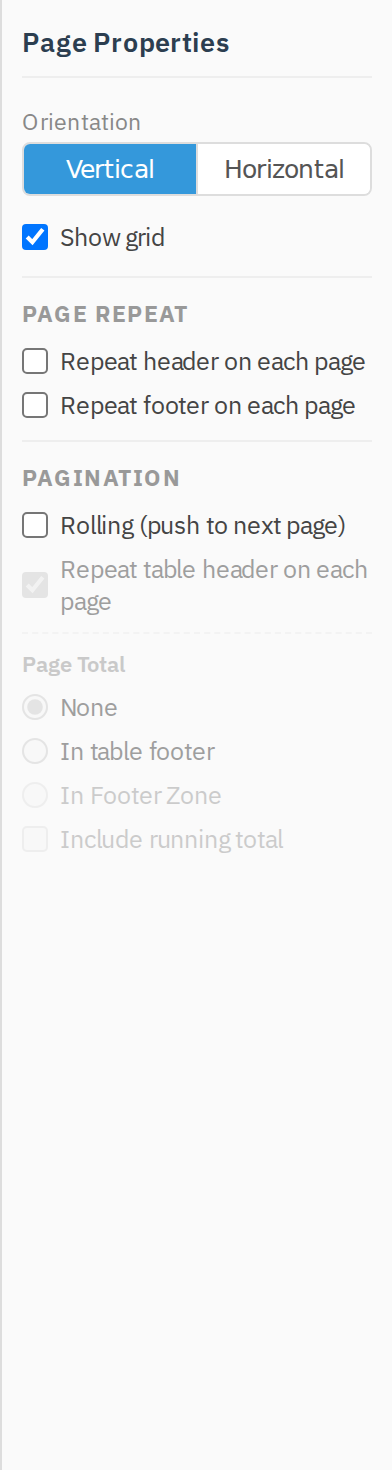
- Orientation - Vertical (portrait) or Horizontal (landscape)
- Show grid - a snap/alignment grid on the canvas (does not print)
- Page Repeat - repeat the header and/or footer on each page
- Pagination -
Rolling (push to next page)andRepeat table header on each page, plus a Page Total mode (none, in table footer, in footer zone, or a running total) - available once a Line Items Table is present
The page size itself is fixed (US Letter); orientation is the only dimension you change.
Saving the design
Click Save to persist the design to this document. The layout travels with the document wherever it is viewed, shared, or downloaded. The designer does not save to a separate template library - reusable invoice templates for the workflow spawn_invoice_from_template action are managed elsewhere (see Templates).
Reusing across document types
The same canvas, fields panel, inspector, and page properties power:
- Payroll statements - staff payroll payouts
- Expense reports - expense summaries
- Payment reports - payment run summaries
- Contracts - contract body layout
Each document type supplies its own data fields; the tooling is shared.
Next steps
- Templates - invoice templates used by the workflow spawn action
- Creating Invoices - fill in the data the designer will render